
Note:
If you are a contractor, you can only view fees incurred by you and only for the firm through which you are logged on.
The Fees Report data is indicative due to fees for an e-dealing or e-survey being subject to change until the transaction is complete (as are fees for paper dealings and manual surveys). The report includes these fees, regardless of whether they were paid up front or charged.

The report will also show any notes that you added to fee items through your e-dealing or e-survey.
Where to find a fees report
To generate a Fees Report:
- Log on to Landonline.
- Go to Landonline Searches.

- On the menu bar, click 'Tools', then select 'Fees Report' from the drop-down menu (as shown below).
When you open a Fees Report, the screen will automatically default to User. You can choose to select whether to view a report of fees for a User or Firm. Note that you can only generate Fees Report details relative to your firm.

Note:
If the report is for a User other than yourself:
- Type the User Id for the user required.
- If you don't know the Id for the user, click Search... to search and select the user.
- Type the date range for the report (unless you want to report on a client reference or transaction Id).
- If the report is for a client reference and/or a transaction Id, type the exact match in the field(s), including the use of capital letters where appropriate.
- When you type details in the Client Reference 1, Client Reference 2 and/or the Transaction Id fields, the Start Date and End Date fields will clear and the Search... button will be disabled. The report defaults to your firm.
- If you decide against entering a Client Reference or Transaction Id, click in the Start Date field to activate the date fields again.
- Click Generate Report. Landonline displays the report.
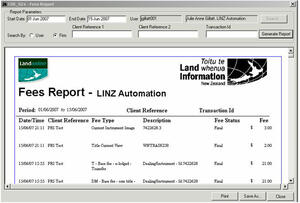
Your Fees Report for the period and user or firm will then display in the Fees Report window.
In addition to viewing the Fees Report on screen, you can also print or save the report (the 'Print' and 'Save As' buttons are in the lower right corner of the window).

Getting the data: click 'save as'
You can save the data shown in the Fees Report to your own computer in virtually any format. For example, you may want to import the data to your accounting system, or sort it in a spreadsheet.
To start, click the 'Save As' button to display the 'Save as' dialogue box.

In the 'Save as' dialogue box, you should:
- Choose a folder on your computer or network to save the data file into - Save in.
- Give the file a name - 'File name'.
- Choose the file type you want from an extensive list – 'Save as type'.