A step-by-step guide to connecting to LDS Web Feature Services (WFS) in QGIS.
Before you start, read our guide to web service versions and version support in GIS applications to check which web services your version of QGIS supports.
These are short codes (such as abcdefgh123456789) unique to each LDS user, and simplify the process of accessing web services.
How to use LDS Web Feature Services (WFS) in QGIS
The following process for accessing LDS Web Feature Services in QGIS is performed using QGIS version 3.4.11.
Tip: Setting a limit on your WFS request
Some LDS datasets (for example, the Primary Parcels dataset) are too big to load in QGIS without limiting the number of features returned. If you try to load a large LDS dataset without first setting a limit you may get an HTTP 504 timeout error.
There are a few ways to set a limit within QGIS, including limiting the layer extents or setting a maximum number of features that will be requested.
Scale dependent rendering can also be set on the WFS layer, so it does not draw at small scales. A scale dependency can be set in the Layer > Properties > Rendering menu.
You can also create a custom filter to limit the WFS request by feature type or bounding box extent, for example. More information about these filtering options is on our page about WFS filtering.
Step-by-step
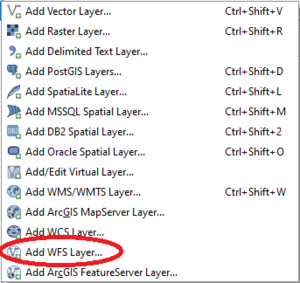
In the QGIS application, go to Layer > Add Layer. Click the Add WFS Layer (globe icon) to bring up the Add layer window:
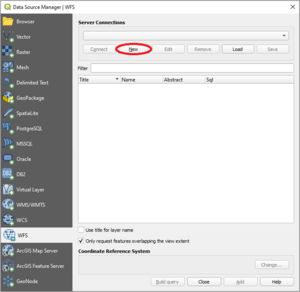
Click 'New'
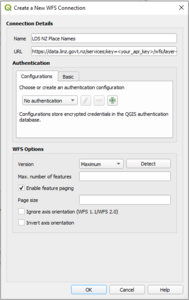
Enter a name of your choosing in the Name field.
Copy and paste the WFS URL from the ‘Services’ tab of your layer of choice in LDS into the URL field. For example, see the Services tab for the NZ Place Names (NZGB) dataset. NZ Place Names (NZGB)
Click OK. The LINZ Data Service knows from your API key that you’re a registered user, so there is no need to enter a username and password.
Note that for large datasets you may want to enable feature paging. This periodically returns the data in pages, with each page including a specified number of features (such as 5,000 features per page). We recommend that you set the page size to no more than 10,000 features.
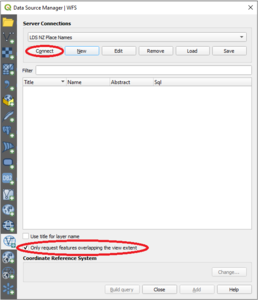
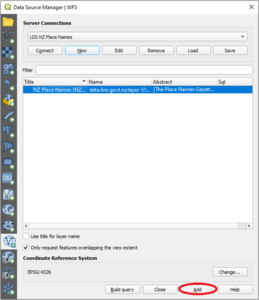
Now that you have created a new connection under Server connections, tick the Only request features overlapping the view extentcheckbox. This improves WFS performance by only requesting features in a bounding box. Click the Connect button:
Look in the layer list that is returned from the LINZ Data Service, and highlight the layer you want. Click Add to add it to your map.
Note that a SQL query can be added under the 'Sql' field in the window above before loading the layer from the LDS server. You can build the query in SQL query composer.
The composer can be opened by double-clicking the Sql field or clicking the Build query button in the window above. This is similar to a SQL query on a database. Our help page on WFS related timeouts provides some example filters.