
You can filter cadastral vectors in Web Search to display vectors that match your selected properties in the filter.
- When you delete the vector layer from the spatial map, the filter is removed.
- You can’t save a filter, and your filter won’t automatically apply when you next open Web Search.
1. Turn on cadastral vector layer and open filter
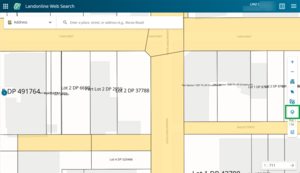
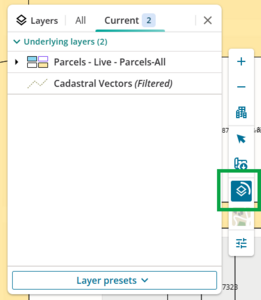
Select the Layer control icon from the Map control toolbar to open the Layer control panel.
Under All layers, left-click the arrow next to Vectors to expand it.
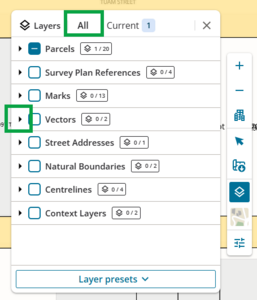
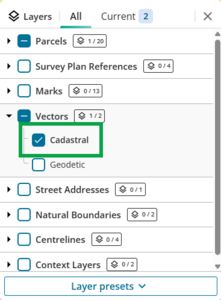
Select Cadastral to turn on the Cadastral vectors layer.
Select the Current layers tab.
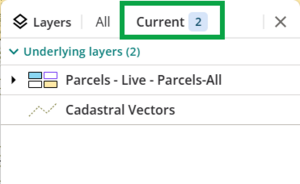
Hover your mouse over Cadastral Vectors in the panel to view the available icons.
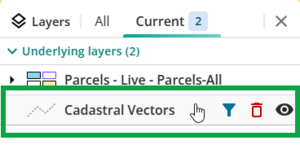
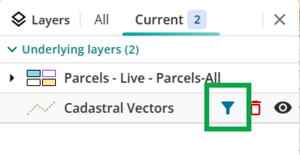
Select the Add filter icon (the funnel).
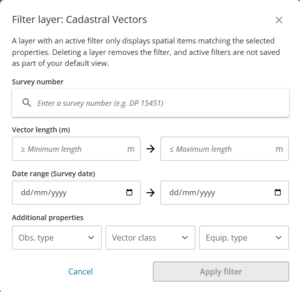
The Filter layer: Cadastral Vectors panel opens.


2. Select properties and apply filter
You can filter vectors by survey number, vector length, date range, observation type, vector class, and equipment type.
You can complete as many fields in the filter as you need.
Once you have chosen your filter values, select Apply Filter at the bottom right of the filter panel.

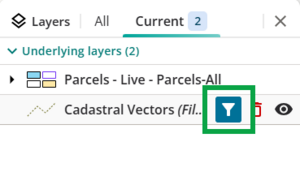
The Cadastral Vectors layer in the Current layers tab will show (Filtered).

When a filter is active the filter icon (the funnel) changes from Add filter to Edit filter.

See also: Edit or remove filter
Filter by survey number
You can filter vectors from a specific survey.
Enter a survey number and select the correct survey from the results in the dropdown.

Filter by vector length
You can choose from:
- minimum length of the vector in metres – greater than or equal to
- maximum length of the vector in metres – less than or equal to
- a range between the 2.
If you are selecting a range, the minimum length cannot be greater than the maximum.
Enter the required length(s) to the closest metre, or use the up/down arrows at the right of the minimum and maximum fields to increase or decrease the entered length 1m at a time.

You must enter whole numbers
If you enter a decimal value, for example 1.2m, the selected field will display red. A tooltip appears when you hover your mouse over the box: ‘Please enter a valid value. The two nearest values are x and y’, where x and y are the whole numbers either side of the decimal you have entered.

Re-enter your length as a whole number, with no decimals.
Filter by date range (Survey date)
You can select a date range for when the vector was created, by selecting:
- a date ‘from’ in the left-hand box, and/or
- a date ‘to’ in the right-hand box.
The ‘from’ date cannot be after the ‘to’ date.
Either type the date(s) into the field or select the date via the calendar icon at the right of each date field.

Filter by observation type
You can filter vectors by observation type. You can choose 1 or more types from the list, or All to select all listed types.
Select Obs. Type then left-click the checkboxes to filter by vectors that have a recorded:
- Arc length
- Bearing
- Chord Bearing
- Sea Level Distance.

Note that filter by observation type will include all vectors with any of the selected values, rather than vectors with all the selected values. For example, if you select Arc length and Bearing, the filter will display all vectors that have an arc length, as well as all vectors that have a bearing.
Filter by vector class
You can filter vectors by vector class. You can choose 1 or more classes from the list, or All to select all listed classes.
Select Vector class then left-click the checkboxes to filter vectors with a class of:
- A
- B
- C
- D
- I
- II
- III
- IV
- Unknown.

Filter by equipment type
You can filter vectors by the equipment type used to measure them. You can choose 1 or more types from the list, or All to select all listed types.
Select Equip. type then left-click the checkboxes to filter vectors that have a recorded equipment type of:
- GNSS
- Old Adopted
- Theodolite/Band
- Total Station
- Unknown.

3. Edit or remove filter
You can edit or remove the filter without removing the vector layer from the map.
Edit filter
Reopen the Filter layer: Cadastral Vectors panel by selecting the Edit filter icon from the Current layers tab.
Make any edits to the filter as required, then select Apply filter. Select Cancel to cancel your edits.

Wait for the filtered layer to load, then your new set of filtered vectors will display on the map.


Remove filter
Reopen the Filter layer: Cadastral Vectors panel by selecting the Edit filter icon from the Current layers tab.
Select the Remove filter icon (the rubbish bin) at the bottom left of the panel.
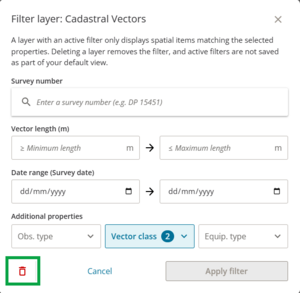
- The filter is removed and all cadastral vectors will display in the map.
