
Landonline can’t always pre-validate the content of fields such as free text and cannot validate attachments.
Overview
While pre-validation is running, the survey will be read-only.
If you perform more than 1 pre-validation on a survey, Landonline replaces the previous report with the new pre-validation results.
If the underlying data is in error and you would like Toitū Te Whenua to inspect the data, create an exception request.
See Create an exception request.
How to pre-validate your survey
Select the Pre-validation icon in the left-hand Workflow control bar.

The Pre-validation panel will display.
The first time you open the survey, the Run pre-validation icon will display in 2 places: the centre of the panel and the top panel bar.

Left-click the icon to Run pre-validation. The survey will lock and be read-only until pre-validation is complete.
Once complete, the panel displays:
- when the last pre-validation was run, and by who
- the pre-validation results under 2 tabs: Tests and Adjustments.
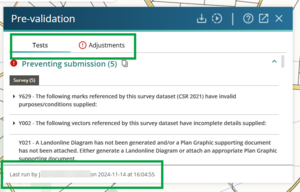
The Tests tab shows when pre-validation runs successfully. Tests fall into 4 types:
- Preventing submission (red exclamation icon), includes test failures that will need to be resolved before you can submit your dataset to LINZ.
- Warnings (orange triangle icon), where information in your survey contradicts itself, or doesn’t match existing LINZ data. These need to be resolved where appropriate or addressed in your survey report.
- Additional relevant information (blue information icon), including areas that were unable to be fully tested.
- Compliant areas which have passed (green tick icon), including plan generation.
For more information on the Tests, see:
Pre-validation tests explainedThe Adjustments tab provides feedback on the survey against the survey capture details:
- Minimally constrained failures
- Fully constrained failures.
The adjustments are mathematical evaluations of the relationships between the new marks captured, and how they compare with the mark and vector information already in Landonline.
For more information on the Adjustments see:
Pre-validation accuracy tests explained
Run further pre-validations by selecting Run pre-validation on the top panel bar.

The pre-validation process starts immediately, and a message appears in the panel to say the pre-validation is running.
The survey will lock until pre-validation is complete.
- When the pre-validation is complete an updated summary of results will appear.


Errors listed under ‘Preventing submission’ must be corrected before submission is possible.
Copy pre-validation results
You can get a copy of any of the pre-validation Tests or Adjustments results.
Select the Copy to clipboard icon next to the relevant section header.
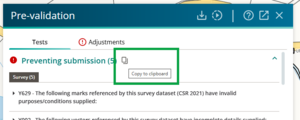
- The pre-validation information will appear in your computer’s clipboard.
- Paste the content into a document, such as a Google Doc or MS Word file. If you want to keep a copy of this information, you can edit it and save it in your system.

Download full pre-validation report.
Select the Download icon on the top panel bar.
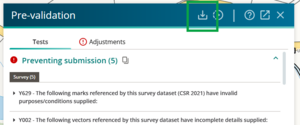
- The information will download in plain text format which can then be pasted and edited in a document such as a Google Doc or MS Word file.
