The Workflow control bar
The Workflow control bar is on the left of the page.

Hover over an icon to find out what it's for, and select an icon to open its panel.
The panels
- You can have multiple panels open at once. The icon in the survey workflow panel highlights blue when a panel is open.
- Each panel is designed so you can work through them as you read – left to right, top to bottom.
Click the diagonal arrow in the panel header to expand the panel into a separate window. Once popped out, you can move it onto a separate screen.

- If a pop-out panel ends up behind the spatial view, click on the panel’s icon in the workflow control bar to bring it forward again.
- And click the X in the top right corner to close the panel.

Visible columns
The following panels all have Column visibility functionality:
- Marks
- Vectors
- Existing parcels
- Irregular lines
- New parcels
- Supporting documents
To change the columns that appear on one of these panels, click on the Column visibility icon in the top-right corner and then select or unselect the options.
Your column selection will remain even when the panel is closed and re-opened and when you close and re-open the survey dataset.
You can make all the columns visible again by selecting Reset columns.

Download .CSV file
The following panels all have Download CSV functionality:
- Marks
- Vectors
- Existing parcels
- Irregular lines
- New parcels
- Schedule / memorandum
- Supporting documents
To download the panel information for one of these panels as a .CSV file, select the Download CSV icon on the top right of the panel, just below the panel header.
The information will download in a .CSV file format.
The columns of data that are downloaded are those that are selected using the Column visibility function. For example, in the Vectors panel, if the Equipment column box is unchecked in the Column visibility drop-down menu, it will not be included in the CSV file download.

Additional tools
Some of the panels, have tools located on the top right-hand corner. For example, the Marks panel has an Automatic mark linking icon. If you click this, an automatic mark linking dropdown menu appears. You can then select one of the options, the process will run, and you will see a summary of the results.

Within each panel
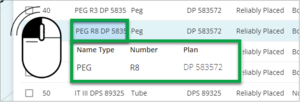
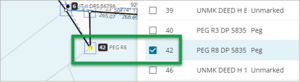
You can select a row in any panel, by clicking on it.
- Once selected in the panel, it will also highlight in spatial view.
Conversely, if you click a mark in spatial view, it will show as selected in the panel – plus the panel will scroll to the mark you have selected.
- To select multiple rows at a time hold down Shift on your keyboard, select the first row you want to include, and then the last row you want to include. All the rows in-between will be automatically selected.
- If no rows are selected, check the box just to the left of the ID header to select all rows.
- If rows are already selected, then check the box just to the left of the ID header to deselect all rows.
If you want to edit data in a panel, double left click on the field. Your changes will save automatically.