
Spatial view contains:
- all the spatial data that exists in the survey – marks, vectors, irregular lines and parcels
- the CSD header at the top left of the screen
See CSD header - the Workflow control bar at the left of the screen
See Workflow control bar and using the panels - the Tools control toolbar at the right of the screen.
See: Tools control toolbar

Saving your work
Landonline Survey auto-saves as you work.
There is no undo button, and deletions are irreversible.
Zoom and move around spatial view using your mouse
1. Move (pan) around spatial view
Left-click and hold the mouse button down while moving your cursor to move the screen.
2. Zoom in or out of spatial view
You have 2 ways to zoom spatial view using your mouse:
a. Use mouse scroll wheel to zoom in or out
Place your mouse cursor over the area you want to zoom into and use the scroll wheel on the mouse to either zoom in or out.
b. Use shift key and mouse to zoom in on an area
Hold down the Shift key on your keyboard then left mouse-click and drag to draw a rectangle. When you release the left mouse-click the screen will zoom in to that rectangle.

You can also use the zoom tools in the toolbar to zoom in and out of spatial view.
See Tools control toolbar – Zoom functions
Select captured features in spatial view
Select a feature
Left-click on a captured feature to select it. You can select captured:
- marks, including placeholders
- vectors
- lines – irregular or right-lines
- parcels.
Selected items are highlighted pink.

By default, you can only select 1 of the same type of feature at a time, for example, 1 mark and 1 vector. Selecting another feature of the same type will deselect the already selected feature.
Where 2 parcels are in the same place, to select the correct parcel you will need to open the New parcels panel and select it from there.
Multi-select features
To multi-select features, either:
- hold CTRL and left-click on each feature
- use the Draw to select features tool
See Draw to select features - select features using the panels.
See Workflow control bar and using the panels
Deselect features
Left-click on a selected feature to deselect it.
- If more than 1 of the same type of feature is selected, left-clicking on 1 will deselect them all.
- To deselect only 1 of multi-selected features, hold CTRL while left-clicking on the feature you want to deselect.
To deselect all selected features, either:
right-click anywhere in spatial view to open the context menu, and select Deselect features
See Context menus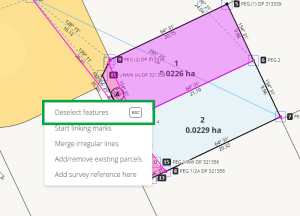
- press ESC on your keyboard.

Select existing features
You can also select existing Landonline features to check their details or adopt them into your dataset, using the Inspect and adopt tool.

For more information, see:
Use the Inspect and Adopt tool
Context menus
Context menus provide easy access to frequently used functions in spatial view, while still providing maximum space to work.
Right-click within spatial view to open context menus. The available menu options will vary depending on:
- where you click, and
- which features are currently selected.
Right-clicking on a captured feature opens the context menu specific to that feature. The available options depend on whether 1, or more than 1 of the features are selected.
General context menu
Right-click in spatial view, avoiding any captured features.

This opens the general context menu with options to:
- Deselect features – appears only if any features are currently selected. This will deselect all selected features.
- Start linking marks – see Linking marks using the spatial view
- Merge irregular lines – see Merge irregular lines
- Add/remove existing parcels – see Add or remove an existing parcel using spatial view
Add survey reference here – this will place a survey reference label at your mouse cursor’s location in spatial view.
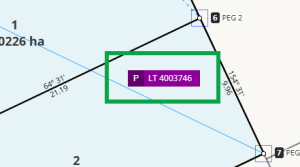
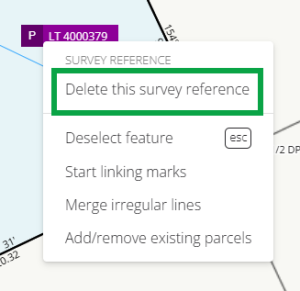
You can right-click on an added survey reference label to open a context menu and select Delete this survey reference to remove the label from the spatial view.


These general context menu options also appear on most of the feature specific context menus below. Note: Start linking marks is unavailable in the captured mark context menus.
Marks context menus
Unlinked mark
Right-click on an unlinked mark to open a menu with options to:
- Link mark – opens the Mark linking panel. See Linking marks using the spatial view
- Link mark by node ID – see Link mark by Node ID
- Edit mark – opens the Marks panel, with the selected mark highlighted
- Delete mark.
The selected mark’s name is shown at the top of the menu.

Linked mark
Right-click on a linked mark to open a menu with options to:
- Unlink mark
- Edit mark – opens the Marks panel, with the selected mark highlighted
- Delete mark.
The selected mark’s name is shown at the top of the menu.

Multiple marks
Right-click on a selected mark, when multiple marks are selected, to open a menu with options to:
- Unlink marks – unlinks all selected marks. Only available if at least 1 linked mark is selected.
- Delete marks – deletes all selected marks.
The number of selected marks is shown at the top of the menu.

Placeholder
Right-click on a placeholder to open a menu with the option to:
- Delete placeholder(s) - deletes all selected placeholders.
The number of selected placeholders is shown at the top of the menu.

You will need to unlink a mark from a placeholder before you can delete the placeholder.
Vector and line context menus
Vector
Right-click on a vector to open a menu with options to:
- Delete vector
- Edit vector – opens the Vectors panel with the selected vector highlighted.
For boundary vectors, there may also be options to:
- Delete line – deletes the captured parcel boundary line (CPBL). This doesn’t affect the vector and is often used for troubleshooting capture errors. Deleting this line will unlink any associated parcels.
- Edit line – opens the Lines panel. Note: This line won't appear in the panel as you can’t edit this type of line.

Line with no associated vector
Right-click on an adopted or irregular line to open a menu with options to:
- Delete line
- Edit line – opens the Lines panel with the selected line highlighted.

Multiple vectors and/or lines
Right-click on a selected vector, when multiple vectors are selected, to open a menu with options to:
- Delete vectors – deletes all selected vectors.
If the selected vector you right-click on is a boundary vector, then there may also be the option to:
- Delete lines – deletes any captured parcel boundary lines (CPBLs), as well as any currently selected adopted or irregular lines. This doesn’t affect the vectors. Deleting these lines will unlink any associated parcels.
Right-click on an adopted or irregular line, when multiple lines are selected, to open a menu with options to:
- Delete lines – deletes all selected adopted and irregular lines, as well as any currently selected captured parcel boundary lines (CPBLs). This doesn’t affect the vectors. Deleting lines will unlink any associated parcels.
The number of selected vectors and/or lines is shown at the top of each section of the menu.

Parcel context menu
Linked parcel
Right-click within a selected linked parcel to open the general context menu with the added option to:
- Move parcel label – see Move a parcel appellation label.
Move parcel label is unavailable if more than 1 linked parcel is selected.
