
The Tools control toolbar on the right of the page has tools for working on a survey spatially.
Hover over a button to find out what it is for.
- Zoom functions
- Layers
- Inspect and adopt
- Draw to select
- Map settings - Turn on and off opening panels in new windows, and auto-regenerating the spatial window
- Regenerate and Auto-regenerate.

Zoom functions
Use the plus icon to zoom in, the minus icon to zoom out and the zoom to function to zoom to, and centre on, the survey.
Layers
Use the Layers tool to manage layers – survey plans, parcels, marks, vectors, lines. You also use it when you want to display labels
When you open a survey the default layers display. If you want to see which layers are being displayed, or need other layers displayed or hidden, for example, toggling on underlying marks or toggling off captured vectors, the Layers panel is where you do this.
Note: Any changes you make in the layers panel will reset to the default settings when you exit the survey.
What to do
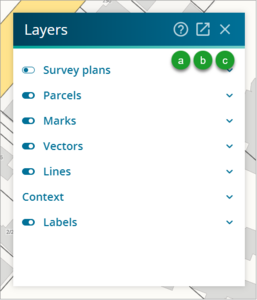
- Select the Layers icon. The Layers panel will open. From the Layers panel header you can:
- Access support content relating to the Layers panel.
- Pop the Layers panel out into a separate window, which allows you to move it on to a second screen, if you have one.
Close the Layers panel.
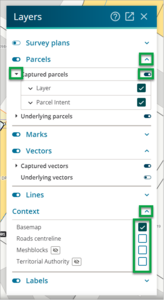
There are a range of options for each function you see in the Layers panel, which will vary depending on the function. Select the arrows to view further options and use the toggle buttons or check boxes to turn layers and labels on and off.
The Layers menu on the Tools control toolbar also allows users to filter the marks displayed on the spatial view. See Viewing existing marks in Spatial View


Field book references
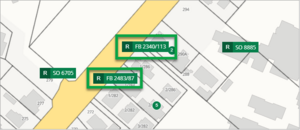
To display Field book references spatially, open the Layers panel and toggle on Survey plans.
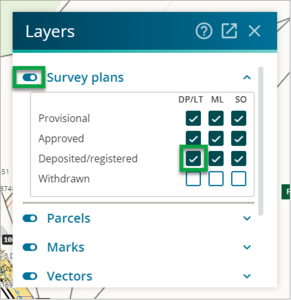
Field book references will display spatially.


The changes you make in the layers panel will be automatically reflected in spatial view.
Inspect and adopt
Use the Inspect and adopt tool to get more information on your survey. If you want to adopt existing boundary vectors, capture lines or process balance parcel vectors. See the Use the Inspect and Adopt tool topic for more information on using the tool to capture a dataset.
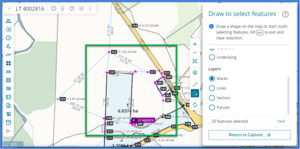
Draw to select features
The draw to select features functionality gives you the ability to bulk select marks, lines, vectors and parcels for captured and underlying data.
The multi-select functionality works slightly differently depending on whether you are selecting captured or underlying features.
Selecting captured features
What to do
Select the Draw to select features icon in the Tools control toolbar.

By polygon is automatically selected (By square functionality is coming soon).
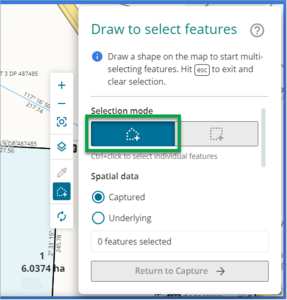
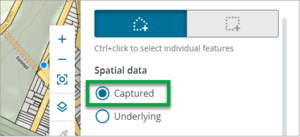
In the Spatial data section, select Captured. Note: Captured is selected by default.
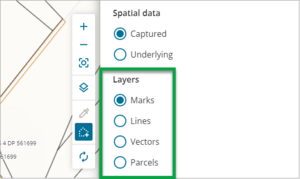
- Select layers:
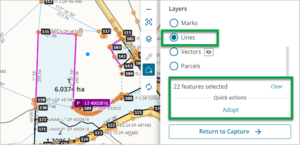
- Marks
- Lines
- Vectors
Parcels
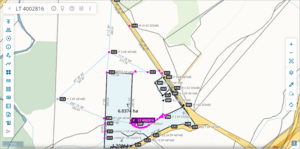
- Click to select a number of objects simultaneously by drawing a polygon around a number of features:
- Select each desired vertices of the polygon
Select the start point to close the polygon, or double click on the last vertex to close the polygon.
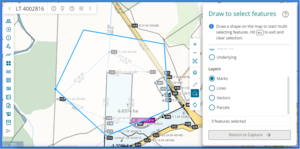
- The objects within the polygon will then be selected and highlighted
Hold the Ctrl key down and use your mouse to select/deselect individual features.


Additional selections
Once objects are selected, if you draw a second polygon around part of the selection, the second polygon features that are already selected will be deselected and features that are not selected will be selected.

Once you're happy with the selected features, select Return to Capture.
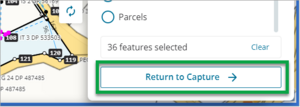
After you select features using the polygon, and select Return to Capture, the multi-select function closes and the selected features remain selected. You can now deal with, or address them, as you wish.


Selecting underlying features
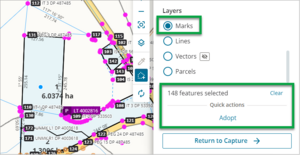
After selecting the Draw to select features tool from the Tools control toolbar, select Underlying in the Spatial data section.

To select underlying features, make sure you have made underlying marks, lines or vectors visible in the Layers panel options.
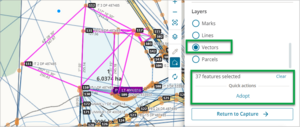
After using the polygon to select multiple underlying features, Quick actions will appear to allow you to adopt these features into your survey without further button presses.
The quick action will depend on the type of feature selected:
The quick action for underlying Marks is Adopt. This will add all the selected marks to the survey as adopted marks. They will appear in the spatial view as linked marks and they will be listed at the bottom of the Marks panel.
The quick action for underlying lines is Adopt. This will add all the selected lines to the survey as adopted parcel boundary lines. Note that they are not vectors and will not appear in the Vectors panel.
If the underlying line is an irregular line, it will be added to the Irregular lines panel ready for you to complete the relevant fields.
The quick action for underlying Vectors is Adopt. This will add all the selected vectors to the survey as adopted vectors. They will be listed at the bottom of the Vectors panel.
The quick action for underlying Parcels is Add/remove existing parcels. When you select Add/remove existing parcels, the multi-select function will close and the Add/remove existing parcels panel will appear. This allows you to double check you want to add or remove these parcels. If you select Add/remove selected parcels, the selected underlying parcels will be added or removed from the Existing parcels panel.
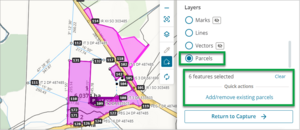
If the parcels are added, they will appear in the Existing parcels panel as parcels to be extinguished. You can edit the Action in the Existing parcels panel.
If you select Return to Capture, while underlying features are selected, the features will be deselected and the multi-select function will close.


Map settings: choose where your panels open
Select Map settings in the Tools control toolbar to choose to have your panels either:
- open automatically in a new browser window
- open in the same window.
To automatically open panels in a new window
Toggle on Open panels in new window. The text becomes dark.

To open panels in the same window
Toggle off Open panels in new window. The text becomes pale. Panels will open in the same window.

Map settings: turn Auto-regenerate map on or off
Select Map settings in the Tools control toolbar to turn Auto-regenerate map on or off.
Auto-regenerate map on
Toggle Auto-regenerate map on.
The Regenerate icon below changes briefly to a tick and then shows a circle with an A inside.

Auto-regenerate map off
Toggle Auto-regenerate map off. The text becomes pale.
The Regenerate icon changes to an empty circle.

Note:
Turn Auto-regenerate off in large surveys to help system performance.
If the spatial view doesn’t display correctly, manually select Regenerate.
Regenerate
Use the Regenerate function to update the spatial view to reflect any changes made to edited information e.g. marks, vectors, parcels.
You can choose to:
- regenerate when requested - Auto-regenerate map toggle is off
- automatically regenerate each time you make a change - Auto-regenerate map toggle is on.
When Auto-regenerate map toggle is off
If you make a change, e.g. add a new vector:
- the spatial view will update to show only that new vector
- it only redraws the affected marks and vector
- the spatial view does not automatically update with the re-calculated relationship with every other mark and vector in the dataset.
Left-click the Regenerate map manually icon to have all the captured data re-calculated and update the spatial view accordingly.

Auto-regenerate map toggle is on
When Auto-regenerate map toggle is on – the spatial map is auto regenerated each time you make a change, which means it automatically updates with the re-calculated relationships with every other mark and vector in the dataset.
