
Overview
- The Inspect and adopt tool allows you to get more information on existing features and adopt existing marks, vectors, lines or process balance parcel boundaries.
- This means you can capture existing data into your dataset (rather than reworking your dataset in third party software and importing a new LandXML file).
- When you adopt vectors from Landonline, the From and To marks are also adopted unless those marks are already linked in your dataset. Additional vector or mark information may need to be captured from the existing paper plan.
Caution
If you adopt vectors already captured in your survey, you create duplicate vectors. You must delete the vectors you do not require before you submit your survey dataset.
If there are no marks captured and you adopt marks, they are numbered from 1000. If you have captured new marks and you adopt existing marks, they are numbered sequentially from the largest number.
In this section we’ll cover examples of how the Inspect and Adopt tool is used to adopt existing marks, vectors, lines or process balance parcel boundaries.
All examples start with selecting the Inspect and Adopt tool from the Tools control bar, on the right side of the screen.
Once selected, you can navigate the spatial view and left click on the feature (line, parcel, vector, mark) to bring up a pop-up box with various options, depending on where you click.
Common elements
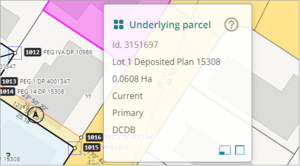
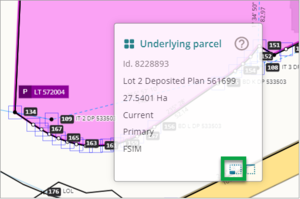
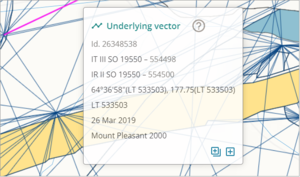
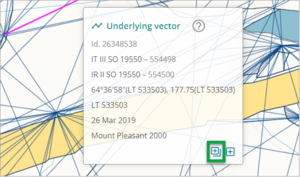
When you select an existing vector, line or parcel, you will see two icons on the bottom right of the pop-up box. Hover over the icons to see more information on what they do, then select the one you need.
Examples of the icons you will see are:
Underlying parcel icons

Underlying Vectors icons
Underlying lines icons
Underlying mark icon
Note: the marks pop-up box has only one option
If you select something in spatial view and there is more than one existing vector, line or mark in that location, you will see a series of dashes on the bottom left side of the pop-up box. Select each dash to see the individual vector, mark or line, and select the one you want to adopt.

Process balance parcel boundaries
What to do
Process balance parcel boundaries
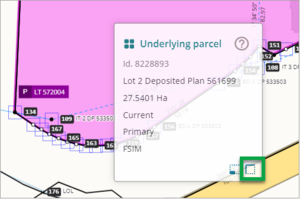
To process balance Parcel boundaries left click on a parcel, the affected parcel will highlight, and the Underlying parcel pop-up box will display.
Select the left-hand square icon at the bottom of the pop-up box to Process balance parcel boundaries.
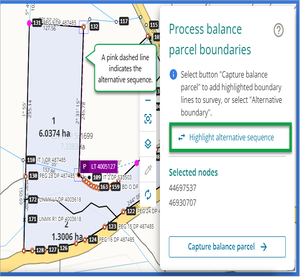
The Process balance parcel boundaries panel will display on the right side of the screen, with instructions.

Select the start and end nodes on Spatial view.

Select Highlight alternative sequence to highlight alternate route of boundary lines to be adopted. The highlighted route is identified by the pink dashes.
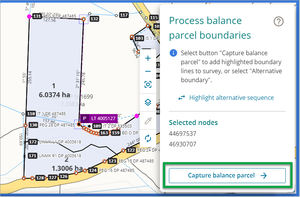
Once the desired route has been highlighted, select the Capture balance parcel button to add this to your dataset, or Esc to exit.


Adopt boundary vectors
To Adopt a boundary vector, select the right-hand square icon at the bottom of the pop-up box.
The Adopt boundary vectors panel will display on the right side of the screen with the instructions.
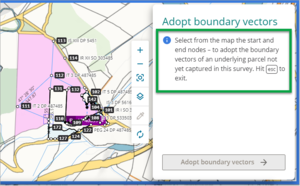
Select the start and end nodes in the spatial view to adopt the boundary vectors.
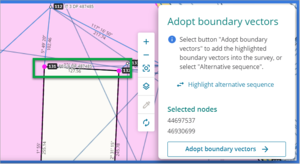
Select the Adopt boundary vectors button to add this to your dataset, or Esc to exit.


Adopting underlying vectors
What to do
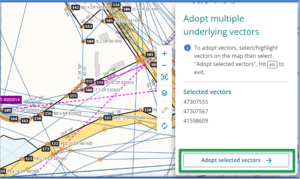
Adopt multiple underlying vectors
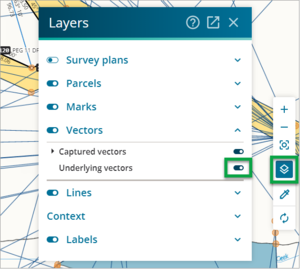
Ensure the Underlying vectors layer is displayed.
To adopt multiple underlying vectors, left click on the first existing vector you need to adopt. The selected vector will highlight, and the Underlying vector pop-up box will display.
Select the left-hand square icon at the bottom of the pop-up box to Adopt multiple underlying vectors.
The Adopt multiple underlying vectors panel will display on the right side of the screen, with instructions, and with the vector you selected listed.
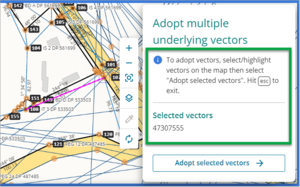
Left click on the other vectors you want to adopt. These will be added to the list in the panel.
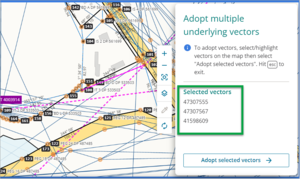
Select the Adopt selected vectors button to add this to your dataset, or Esc to exit.


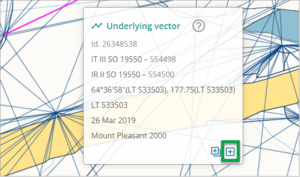
Adopt a single underlying vector
To adopt a single vector, select the right-hand square icon at the bottom of the pop-up box to Adopt a single underlying vector.
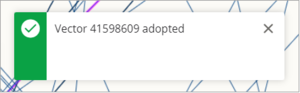
If the vector is successfully adopted, you will briefly see a pop-up message in the top right hand corner of your screen.


Adopt underlying lines
What to do
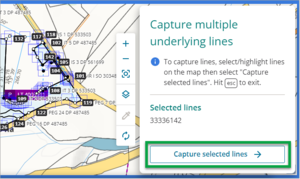
Capture multiple underlying lines
To capture multiple underlying lines, left click on a line. The affected line will highlight, and an Underlying line pop-up box will display.

Select the left-hand + icon at the bottom of the pop-up box.
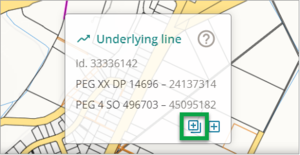
- The Capture multiple underlying lines panel will display on the right side of the screen with the instructions.
Select the Capture select lines button to add this to your dataset, or Esc to exit.


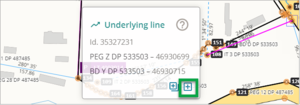
Capture a single underlying line
To capture a single underlying line, select the right-hand + icon at the bottom of the pop-up box.
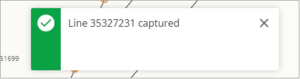
If the capture is successful, you will briefly see a confirmation message in the top right of the screen.


Adopt underlying marks
What to do
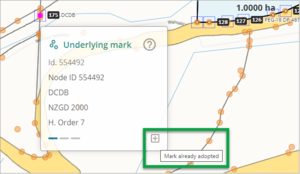
To adopt an underlying mark left click on a mark in the Spatial view to bring up the Underlying mark pop-up box.
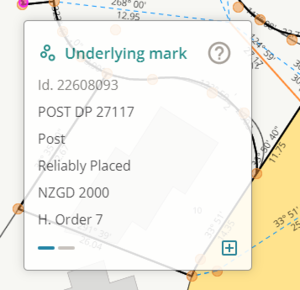
Select the + icon on the bottom right of the pop-up box to adopt the underlying mark.

If the mark is successfully adopted, you will briefly see a pop-up message in the top right hand corner of your screen.

Once you’ve adopted an underlying mark, if you select it again the + icon at the bottom of the pop-up box will be greyed out and you will see a pop-up message telling you the mark is already adopted.


Field book references
What to do
To find out more information about a Field book reference, select the Inspect and Adopt tool then select the field reference.

To see Field book references in spatial view, you need to toggle on Survey plans and ensure the Deposited/registered DP/LT box is selected. For more information see Field book references in the Tools control bar section.