
Warning: Vector limit for surveys in Landonline
The maximum number of vectors in a survey dataset must not exceed 3250.
For information on the vector limit in Landonline and how to deal with large or complex surveys that may exceed this limit see:
Vector limits for surveys in Landonline
About LandXML
LandXML can be used to store and transfer information between parties. As XML formats are based around non-proprietary plain text files, they generally encourage the exchange of data.
This means you can:
- extract authoritative survey data from Landonline, then load the data into your survey software.
For information on how to extract survey data, see:
Survey data extraction into a LandXML file
- export LandXML data from your survey software to import into Landonline.
For information about what you should include when creating your LandXML, see:
LandXML import information and guidance
Once your survey is approved in Landonline, future Landonline users can then extract the new data as LandXML.
For more information on creating LandXML files, see:
LandXML reference documents for surveyors and developers
Key points about importing LandXML into Landonline
What you can import
LandXML is based on the XML (extensible markup language) specifications. You can only import XML files that comply with the LandXML schema.
You can create new datasets, or replace existing datasets, by importing survey data in the LandXML file format.
LandXML files generally consist of:
- previously extracted Landonline data such as marks, nodes, coordinates, vectors, parcels, lines, vertices and survey header information, and
- survey data specific to the new dataset.
Import XML for Land Transfer Plan Land Covenant (PWSI) CSD
When you import a Parcels without survey information (PWSI) CSD with survey purpose Land Transfer Plan Land Covenant, Landonline is unable to map all fields correctly:
- Secondary/tertiary boundaries import into Landonline as non-boundary information.
- No area is captured due to the incorrect non-boundary information.
To ensure your LandXML file imports correctly for this type of survey:
- Change the survey purpose in your created survey in Landonline to Easement.
- Import the XML file.
- Change the survey purpose back to Land Transfer Plan Land Covenant in the Survey details panel.
Your boundaries and parcels will now show the correct imported data.
For more information on Landonline enumeration mappings, see:
Enumeration Mappings applicable to Landonline – LandXML
Importing data overwrites your existing survey
LandXML files can only be imported into a survey that has already been created in Landonline. The created survey will have a CSD number allocated.
Imported data will overwrite any existing data held in Landonline for your survey, including Surveyor reference and Survey description. You will also lose any drafted plans in Plan Generation.
Any attached supporting documents or created TA certifications will be retained after an import.
You need to import a complete survey – you cannot import partial files.
Pre-validate and edit after import
Once imported, the data may need to be edited to complete your survey capture and create your plans. This may depend on:
- the survey software used to create the XML file
- the survey purpose and the mapping applicable to the survey
- any pre-validation failures.
You should always run Pre-validation after import to help you identify any data that could not be imported from your survey software.
How to import a LandXML file into your created survey
Step 1: Open the import panel and upload your LandXML file
Select Import LandXML from the top of the Workflow control bar.
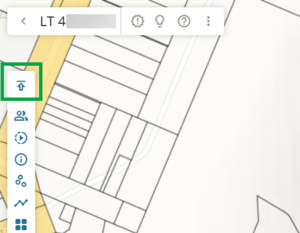
The Import LandXML panel opens.
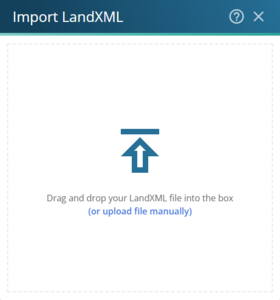
- Upload your LandXML file to Landonline. You can either:
- drag and drop your LandXML file into the box.
- click anywhere inside the box to open file explorer, then browse your computer to locate and open the LandXML file.


Note that Landonline is unable to map all fields correctly for some Survey purposes. For example, see:
Import XML for Land Transfer Plan Land Covenant (PWSI) CSD
Step 2: Run the import
a. Importing a LandXML into a newly created survey:
Once you add your LandXML file, the import process runs automatically.
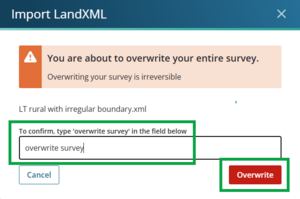
b. Importing a LandXML file over already captured data:
If you are replacing an existing survey, or have captured any data before importing, as soon as you add your LandXML file a warning will appear.
The warning states: ‘You are about to overwrite your entire survey. Overwriting your survey is irreversible.’

Ensure you are importing the LandXML file into the correct dataset as it will overwrite all existing captured data.
- Confirm you want to import your file and overwrite existing data by typing ‘overwrite survey’ in the field provided.
Select Overwrite to continue the import. You can cancel the file import by selecting Cancel.
- The import process will run automatically.

Warning:
Imported data will overwrite any existing data held in Landonline for your survey, including Surveyor reference and Survey description. You will also lose any drafted plans in Plan Generation.
Any attached supporting documents or created TA certifications will be retained after an import.
Step 3: Import process and completion
While the file is importing, you can track its progress.
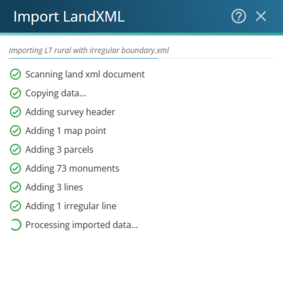
Once complete, if the import was successful, the panel closes automatically.
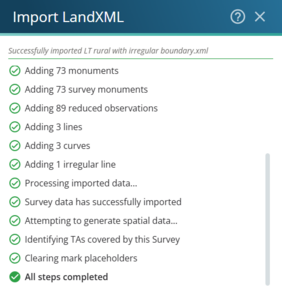
- Your survey will be displayed spatially in the capture screen, and the panels in the Workflow control bar are populated with data.


For aspatial datasets, there will be no spatial capture visible, but data will have been imported into the panels in the Workflow control bar.
Ensure you pre-validate after import to help you identify:
- any data that wasn’t imported from your survey software
- any failures or inconsistencies in your survey.
For more information on pre-validation, see:
Pre-validateSee also:
Editing in Landonline after a LandXML file has been imported