Signing and submitting a survey is the final stage of the survey process. This is when you electronically sign the survey and lodge it with Toitū Te Whenua LINZ.
Preparing a survey for submission
Before submitting your survey you must:
- complete survey capture
- undertake plan generation
- specify the TA certification requirements, if required
- prepare the survey report, or attach as a supporting document
- attach the required supporting documents, such as traverse sheet, survey report.
Clear unneeded Territorial Authority (TA) certificate packages before submitting
When a subdivision dealing is submitted and the associated survey plan includes TA certificate packages that remain unsigned, the dealing will be flagged with a warning that the survey has pending TA certifications. This prevents the dealing proceeding unless the flag is cleared or a LINZ officer has received confirmation from the relevant Territorial Authority (TA) that no further certifications are required.
To avoid delays, please ensure you delete any empty or superfluous TA certificate packages before submitting your survey.
For help with deleting packages, see:
Edit, add or remove a package
Open the Sign and submit panel
Select the Sign and submit icon from the Workflow control bar.
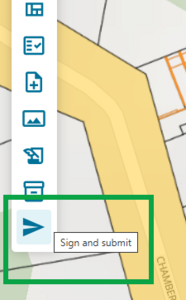
The Sign and submit panel opens.
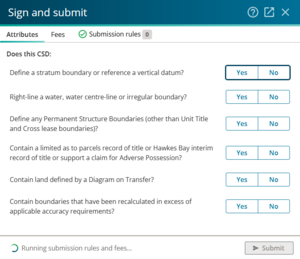
When the panel first opens there is an automatic check of whether the survey meets the submission rules, and a calculation of the fees as they would currently be if the survey were submitted right now.

You can rerun the submission rules and fees again once the initial checks have been completed, or any other stage if you have made changes.
Left-click on Rerun submission rules and fees.

Check and complete the Attributes, Fees and Submission rules tabs
There are 3 tabs in the Sign and submit panel:
- Attributes (the panel opens with this tab visible).
- Fees
- Submission rules.

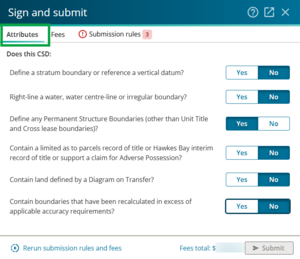
Attributes tab
You must answer all the questions in the Attributes tab.
The Submit button will remain disabled until you have:
- answered all the questions, and
- rectified any submission rule errors, if there are any.
Fees tab
The Fees table shows the fees that will be charged when you submit the survey. This table will update dynamically if the scope of the survey changes. For example, adding more parcels will increase the price.
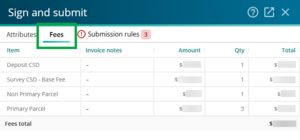
If you are re-submitting after a requisition, this table will show the difference in fees if there has been a change to the number of parcels. Otherwise, the tab will show No changes to fees.
See also: Resubmit survey after a requisition
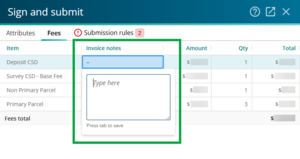
The fees table is read-only, except for the Invoice notes column, where the user can add their own custom notes to the table. These Invoice notes will be shown in the fees report for the submitting firm.
Invoice notes are only saved when you submit the survey. They are not autosaved. Any notes you have entered will be lost if you:
- close the Sign and submit panel before submitting the survey
- select the Rerun submission rules and fees button
- navigate back to your My Work page before submitting the survey.
To add an invoice note:
- Left-click in the Invoice notes field to open a text box.
- Type in your note.
- Press Tab on your keyboard to save the note.
Submission rules tab
The Submission rules tab displays any failures in the survey that will prevent submission. If there are failures, an exclamation mark will show, and the number of failures are displayed in the tab heading.
You will need to resolve any failures listed in this tab before you can submit the survey.

Submit the survey
Once you've resolved any Submission rules failures, the Submit button will become active.
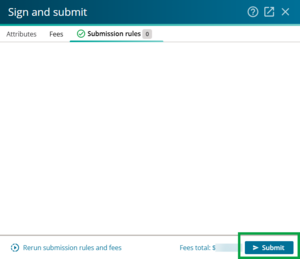
When you select the Submit button, a background process will run to check for any errors not able to be caught in the Submission rules tab.
Once the check is complete, a new Sign and certify screen will appear over the top of the screen you are in.
If you see an onscreen notification
When you select Submit, if anything is picked up during the check, you will be notified on screen.
For example, if the CSD has been modified since the TA certificates were signed, you would see this message:
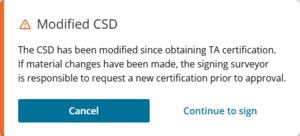
If you need to obtain a new TA certification, you could select Cancel and then start the submit process again once you’ve obtained the new certification.
To ignore the message and continue to sign and certify, select Continue to sign.
Sign and certify
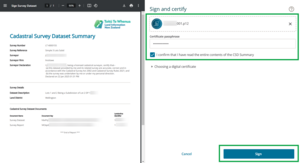
The left-hand panel displays a PDF preview of the Cadastral Survey Dataset Summary (CSD Summary). You can zoom in and out of the preview and print or download it, using the print and download buttons in the top right corner of the preview (a).
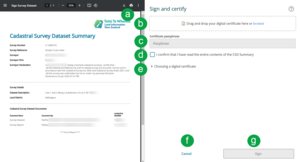
The right-hand panel shows:
b. an area to drag and drop (or select by browsing the computer) a digital certificate
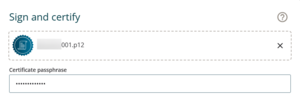
c. a field to enter the certificate passphrase
d. a checkbox to confirm that you have read and understood the CSD Summary
e. an expandable/collapsible area to explain more about the digital certificate
f. a Cancel button, which cancels the signing process
g. a Sign button, which starts the signing process.
The Sign button will remain greyed out until you select the digital certificate, enter the passphrase, and tick the checkbox.
1. Locate and connect your digital certificate
In order to sign surveys, you need to make a connection between the Landonline application and your digital certificate.
- If you use Microsoft Edge or Google Chrome you should only have to connect your certificate once.
- Other internet browsers may require you to choose your digital certificate every time you sign.
If you're having trouble locating your digital certificate, please check with your IT department, your Landonline Trusted Contact, or contact our Customer Support on 0800 665 463.
Select the arrow to the left of the text Choosing a digital certificate to see more information on this process.
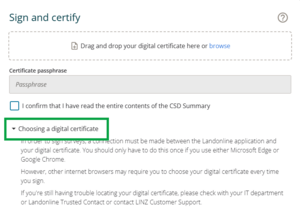
To connect your digital certificate, you can either drag and drop it into the box, or browse for it and then select it.

2. Enter your Certificate passphrase
Next you need to enter your Certificate passphrase.
If you get your passphrase wrong, you’ll have 2 more attempts before you’ll have to restart the sign and certify process.
If you can’t remember your passphrase, call our Customer Support team on 0800 665 463.
3. Select the checkbox to confirm
Confirm that you have read the entire contents of the CSD Summary by checking the checkbox.

The Sign button will now become active and change to a blue box.
4. Sign the survey
Select the Sign button at the bottom right of the screen.
A separate Authentication request pop-up window will appear.
The Authentication request pop-up may appear on a different screen to the one you're working on.
5. Enter your Landonline password
You are still logged into Landonline. However, to continue signing, you need to re-authenticate yourself by entering your password into the Authentication request window.
See below for what do to if you don’t see this.
Enter your password and select Confirm password.
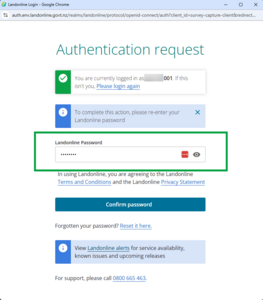
If you get your password wrong, you'll have 4 more attempts before you are locked out.
- Use the Forgotten your password? Reset it here link on the Login screen to reset your password.
See Reset your Landonline password - Or contact LINZ Customer Support 0800 665 463 for assistance.
If you only see the "Enter password in the popup" message
If you only see the pop-up message below and not the Authentication request window, you may need to enable pop-ups in your browser.
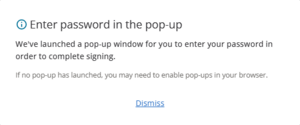
For assistance in enabling pop-ups in your browser, refer to one of the links below:
If you’re asked for a URL use https://app.landonline.govt.nz/survey
You may need to refresh your Landonline page after you’ve enabled popups.
Disable ad blockers and other extensions if necessary
Some common browser extensions – such as ad blockers – may also prevent pop-ups. You may need to disable them for the Landonline website.
Then:
- select Dismiss in the Enter password in the pop-up message, and
- select the Sign button again.
6. Signing complete
Once you've entered your password, the signing process will run in the background.
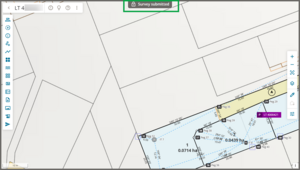
The survey will be locked, and you'll see a message at the top of the screen behind the sign and certify screen stating Survey pending submission. This changes to Survey submitted when the submission process is complete.

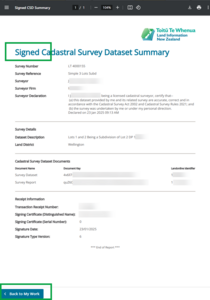
Once signing is complete, the left-hand preview area will display the Signed CSD Summary. All the previous functionality – print, save/download, zoom in/out – will still be available.
Select Back to My Work to go back to the My Work page.
On the My Work page there will be a padlock icon next to the CSD reference. When you hover over the icon you will see:
- Pending Submission while the submission is in progress, or
- Submitted once the submission process has completed.

After survey submission
When the survey has successfully submitted it will progress through the Toitū Te Whenua LINZ validation process.
The survey will remain in My Work until it is approved. You can still open the survey in read-only mode.
Requisitions
During the validation process the validators may raise some issues for you to address before the survey can be approved. If this happens, the survey dataset will be requisitioned and unlocked for you to edit.
For information on the requisition process, and querying or responding to requisitions, see:
On requisition in My Work
Returning or deleting a submitted survey
You can return a survey dataset to make changes or delete it, after you have submitted it and before it has been approved.
For details, see:
Return a survey dataset
and Delete a survey dataset after submission