
Below is a general overview of the steps you should take to capture your survey, generate your plans, and submit the survey. Depending on the type of survey, not all these steps may be applicable, and the order of steps may vary.
Tip: The Workflow control bar in Landonline follows the general workflow of a survey.
Diagram of Landonline survey workflow process
The diagram below shows the general process for a survey to be created, captured, and submitted in Landonline:

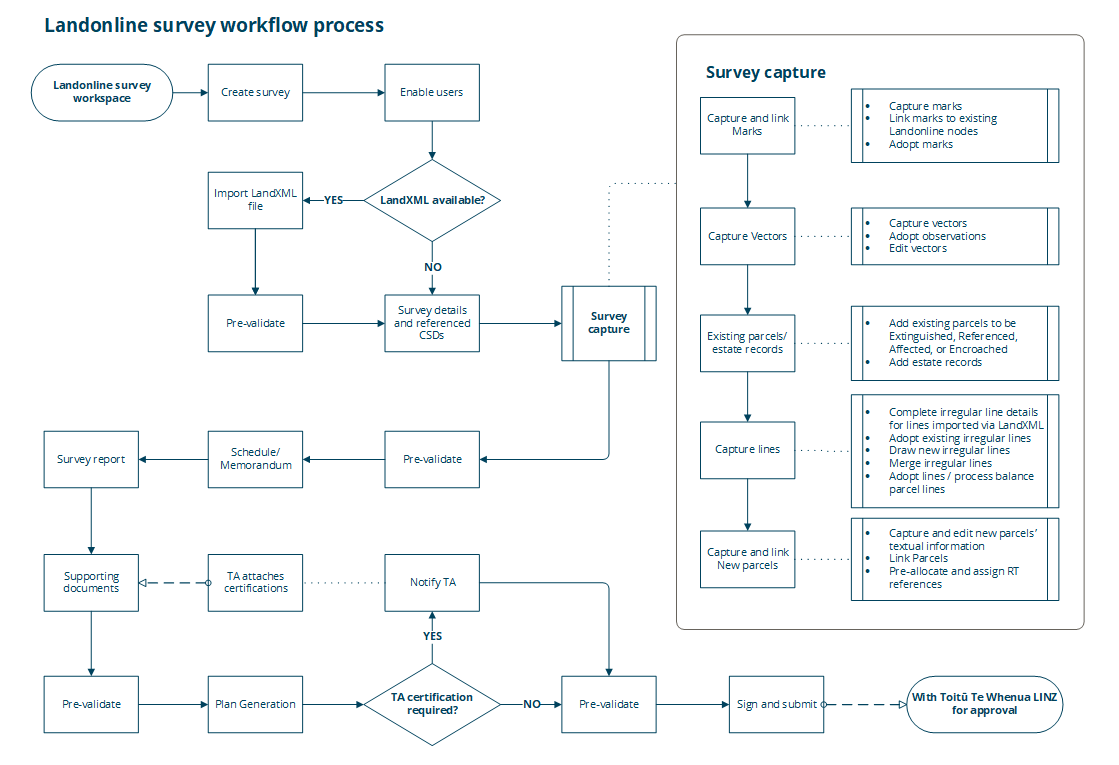
You can download a full-size version of the Landonline survey workflow process diagram as PDF here:
Landonline survey workflow process overview
For further details on these steps, see the relevant section of help content linked under each heading.
1. Create survey in Landonline
Enter the:
- Surveyor’s reference
- Survey purpose
- Land district.
A CSD reference is allocated automatically when the survey is created.
See: Create a new survey
2. Enable users
Assign roles:
- Primary contact
- Signing surveyor.
See: Enable users
3. Import a LandXML file
This may include previously extracted Landonline data such as marks, nodes, coordinates, vectors, parcels, lines, vertices and survey header information, and survey data specific to the new dataset.
Ensure you pre-validate after importing a LandXML file.
Alternatively, you can capture the survey manually.
See: Manually capture a dataset
4. Pre-validate
You can run pre-validation at any stage of survey capture. It is especially valuable to run pre-validation:
- after import
- after capture
- after making any changes to your survey, including capture or survey details
- before opening Plan Generation
- before submission.
See: Pre-validate
5. Edit Survey details and Referenced CSDs panels
- Add/edit survey details as needed.
- Review, add, and edit survey references.
Ensure you pre-validate anytime you change the survey’s details.
See: Survey details
6. Capture marks
- Capture marks
- Link captured marks to existing Landonline nodes
- Adopt marks
- Add, edit, or delete marks.
See: Marks
7. Capture vectors
- Capture vectors
- Adopt observations
- Edit vectors.
See: Vectors
8. Capture existing parcels and estate records
Add existing Landonline parcels to be:
- Extinguished
- Affected
- Encroached
- Referenced.
Add estate records.
See: Existing parcels
9. Capture lines
- Complete irregular line details for lines imported via LandXML
- Adopt existing irregular lines
- Draw new irregular lines
- Merge irregular lines
- Adopt lines / process balance parcel lines.
See: Irregular lines and right-lines
and to process balance parcels: Balance roads
10. Capture new parcels
- Capture and edit new parcels’ textual information
- Link parcels
- Pre-allocate and assign RT references.
See: New parcels
11. Complete automated Schedule/Memorandum
12. Complete automated Survey report
See: Survey report
13. Attach and check supporting documents
See: Supporting documents
14. Generate plans in Plan Generation
Ensure you pre-validate before opening Plan Generation.
- Set label preferences for this plan/future plans
- Maintain diagram layers
- Define user-added diagrams
- Edit layout plan sheets
- Preview layout
- Compile plans.
See: Plan Generation
15. Request TA certification
If required, request TA certification for your survey. The Territorial Authority can add certificates until the survey is deposited.
See: TA certifications
16. Sign and submit survey
Ensure you pre-validate before submission.
See: Sign and submit