Landonline contains many examples where 2 or more marks exist very close together. Often these are not distinguishable even at maximum zoom.
In many instances these are legitimate marks:
- they may represent adopted, disturbed or unproven marks that are in close proximity to each other, or
- there may be a very short vector between adjoining marks.
In other instances these may be marks in Landonline that are incorrect:
- 1 or more nodes may not be linked to topology but are very close to a node that is. Some of these nodes are not legitimate, and
- some nodes may be duplicates (not linked to new surveys, thus creating duplicate marks).
If the nodes are duplicate please advise LINZ by adding a note to the survey report. Nodes are duplicate when:
- mark names are the same, and
- they are not disturbed or replaced.
It is important that you select the correct mark required for either linking or searching purposes. Landonline has 2 approaches to help you when linking marks, when there are multiple marks close together:
Scenario 1: Marks visible at maximum zoom
If you try to link to an underlying mark and there are multiple underlying marks close together that are distinguishable at maximum zoom, Landonline will automatically zoom in to a scale that allows you to see the marks.
For example, in the image below we want to link Mark 1 to Disk 5 DP 524821. Although only 1 underlying mark name is showing, there are in fact 2 underlying marks very close together underneath Mark 1’s position.

When we click to select the underlying mark, Landonline zooms in to a scale that separates the 2 underlying marks visually.

Once both marks are clearly visible, we can decide which mark we want to link to and select the appropriate mark to complete the linking process.
Scenario 2: Marks not distinguishable at maximum zoom
If you try to link to an underlying mark and there are multiple underlying marks close together that are not distinguishable at maximum zoom, you will be prompted with a popup box to help you to identify which mark you would like to link to.
In the example below, there are 2 identical positions recorded in error. The mark names are the same, but the marks are not disturbed or replaced. In this case, rather than selecting them, it would be beneficial to raise the issue with LINZ.

In some cases, duplicate nodes can cause geometry errors. If this occurs, raise an exception request to have the nodes examined and merged.
See Create an Exception request
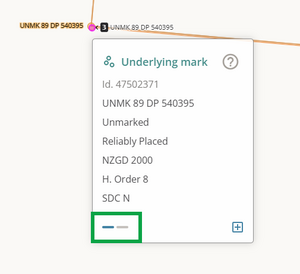
To further investigate why 2 marks the same are shown in the underlying marks layer, you can use the Inspect and adopt tool to learn more about the marks.
Select the Inspect and adopt tool, and left-click on the underlying mark.

The Underlying mark info panel opens. You can toggle between info panels for the 2 underlying marks shown in that position, by clicking on the blue dashes at the bottom of the panel.