
Are you doing a subdivision?
Visit the subdivisions page, or take a look at this handy checklist:
Set up a new title dealing
- In Workspace, click the pencil ('Create dealing') icon to display the Create Dealing screen.

- Enter your client reference(s) in the Client Reference field(s).
- In the Plans for Deposit area:
- Click 'Add plan'

- Enter the Survey Plan No. (the default type is LT for other plan types select from the drop down menu).
- If you wish to have your name as the Primary Contact and your Conveyancing Professional appear automatically, check the Add Default PCs and CPs check box.
- Click 'Add plan'
- In the Instruments area click 'Select instrument' to open the Search Instrument Type screen (if required).

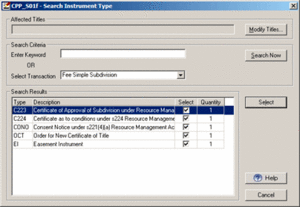
- To search using a keyword, enter one or more words in the Enter Keyword field (eg Resource Management, Mortgage, etc). If you enter multiple words Landonline performs an exact match search.
- To search using a transaction type, select the type in the Select Transaction field drop down list (eg Fee Simple Subdivision).
- Click 'Search now' to return search results for your selection. Check or uncheck instruments as required to indicate your selections. You can also change the Quantity of instrument types.

- Click 'Select' to close this screen.

- The selected instruments will be added to the Create Dealing screen.
- Click or tab to the Title Ref field. This opens the Enter Titles screen where the affected titles are entered. Any pre-allocated titles will appear automatically but will require you to check the Affected checkbox.
- Review the default entry in the Parties field (change if required).
- Click 'Add instrument' to insert additional instruments (repeat as required).

- Complete the role details for each instrument:
- If the name has not been automatically added, type the full name or user Id of the Primary Contact for each instrument, or click the binoculars ('Find') icon to search for their name.

- Enter or change the Conveyancing Professional name, if required, or click the binoculars ('Find') icon to search for their name.
- If the name has not been automatically added, type the full name or user Id of the Primary Contact for each instrument, or click the binoculars ('Find') icon to search for their name.
- Review the default role for Release and change if required. The stamp ('Standard defaults') icon displays beside the standard defaults and should only need changing in rare circumstances.

- Review the default role for Fees. You may have different parties responsible for different instruments within the same dealing. The stamp ('Standard defaults') icon displays beside the standard defaults and should only need changing in rare circumstances.
- Review the Default Submitting Firm - this cannot be changed. However in exceptional circumstances the Submitting Firm field may be changed.
- Click 'Save' to save a partially completed e-dealing without closing the screen.

- Click 'Save & close' to save the dealing and close the screen.


In the Search Instrument Types screen:
- Searching by Keyword returns results in alphabetical order. None of the results are selected.
- Searching by Transaction returns results in a pre-defined order and all are selected.
