
What to do
Select the TA Certification icon on the Workflow control bar.
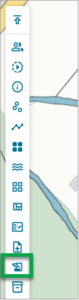
You can also click the three-dot icon on the My Work page and select Create TA request from the dropdown list.

The Certification requests panel displays.
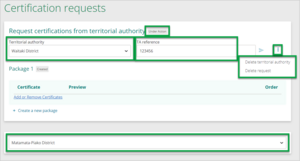
Key features of the panel, and data to enter include:
- Status – the status of the request is shown next to the heading, as well as on the My work page.
- Territorial authority – if a territorial authority is set in the Survey Details, this field will automatically be populated. Otherwise type in the relevant TA or use the dropdown to select the relevant territorial authority.
- TA reference – add a reference for the survey, which can be used in all your interactions with the TA. This will usually be a Resource Consent reference, or similar, issued by the TA.
- Delete territorial authority – select the three-dot menu to bring up the dropdown list and select Delete territorial authority.
- Delete request – select the three-dot menu to bring up the dropdown list and select Delete request.
- Add an additional TA – use the field at the bottom of the panel to select an additional TA and create another certification request. You would use this, for example, if the survey is on the boundary of two TAs.
Select + Create a new package to add a package for the certification request.

- Note that you can add multiple packages by selecting the + Create a new package at the bottom of the panel.
When you select + Create a new package a new package heading will appear at the bottom of the panel.
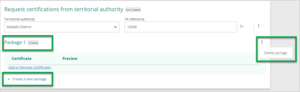
Key features include:
- Package heading – a number will appear as Package 1, Package 2, and so on, to allow multiple packages to be identified.
- Status – the status of the request is displayed next to the Package heading.
- Delete package – select the three-dot menu to bring up the dropdown list, and select Delete package.
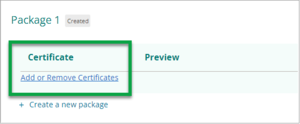
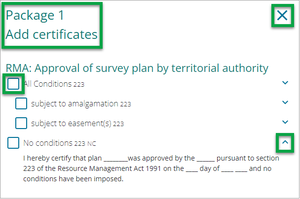
Select Add or Remove Certificates under the Certificate heading.
The Add certificates panel displays, with a list of certification options.
- Use the scroll bar on the right of the certificates to navigate the full list of certificates available.
- Select/deselect the checkboxes to the left of each certificate to add/remove a certificate.
- Use the blue arrow icon to the right of each certificate to expand the details of the certificate.
Use the blue X icon on the top right of the panel to close the panel.
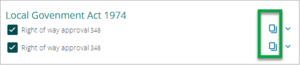
Some certificates allow you to duplicate them. For those that can be duplicated, you will see a duplicate icon next to the expand icon. Select the duplicate icon to duplicate the certificate.
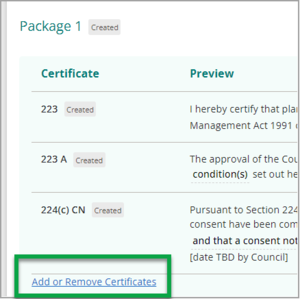
- As you select a certificate, the details are summarised and you are able to preview and re-order its position in the package.
- Certificate – view the number of the certificate, and its status.
- Preview – view the wording of the certificate.
- Order - change the order of a certificate by hovering over the arrows at the end of the certificate row and selecting the up or down arrow.


Select Add or remove certificates to review and edit the information. Note: you can review and edit a TA certification until the survey is submitted.
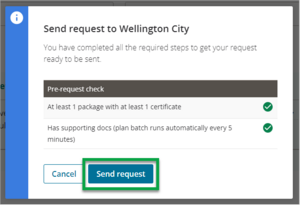
To send the request, select the blue paper airplane icon on the right of the TA reference field.

An information panel will appear with a pre-send check.
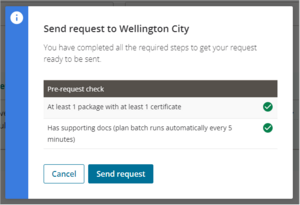
Select Send request (or Cancel, if required).
A pop-up message will appear with the option to Extract LandXML.
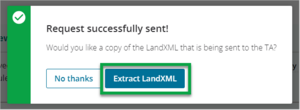
- If you select Extract LandXML, the file will be saved to your computer/devices downloads folder.
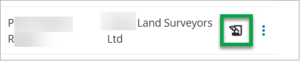
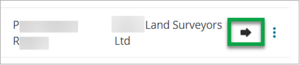
- Icons indicating the current status of a TA request are displayed in the My Work page, at the end/right-hand side of the dataset row:
page with wings = request created
arrow = request pending
tick in circle = under action

green tick = request fully signed

- Once the TA has signed the certification and the document has been issued, the TA certification will become available in the Supporting Documents for that dataset.
- If the dataset has been approved, the dataset will no longer be displayed or available in the My Work page. You will need to search the dataset using Web search to view the supporting documents.


See also TA e-certification.