
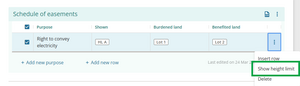
Show height limits for an entry in a Schedule / memorandum table
Select the 3-dot menu to the right of the entry where you want to show a height limit.
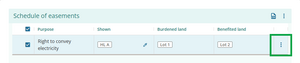
Select Show height limit. This will show the Upper and Lower limit columns for all rows in the table, allowing upper or lower height limit values to be entered.
Double-click in the Upper limit and/or Lower limit fields in the required row to enter the height limit in metres.


Warning: Upper limit must be greater than Lower limit.
If you enter a Lower limit that is higher than the entered Upper limit, you will see a warning message.

Similarly, if you enter an Upper limit that is lower than the entered Lower limit, you will see a warning message.

Check and edit your entered values for the height limits to continue.
Press Enter or Tab on your keyboard to save the height limit.

Select Attach as supporting document to ensure your changes are updated if you have previously attached the Schedule / memorandum to your survey.


Hide height limit:
When you have selected Show height limit, the Upper and Lower limit columns are displayed. If you don’t enter a value into any of these columns in the table, you will see Hide height limit in the 3-dot menu. Select this to hide the height limit columns.

This option will not be shown if you have entered any Upper or Lower height limits in the table.
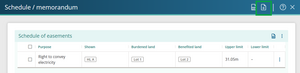
How height limits are shown on the Schedule/Memorandum supporting document
Upper and Lower limit columns will only show in a table on the attached Schedule/Memorandum supporting document if at least 1 height limit has been entered in that table in the Schedule / memorandum panel.
If a value has been entered:
- in 1 field in a row, but not the other, the empty field will show a dash to identify no limit exists there.
- in 1 or more rows in a table, but not in other rows, there will be dashes in any rows where there are no height limits.
For example:
When you enter a value into both the Upper and Lower limit fields in the Schedule / memorandum panel, these will show on the PDF or attached supporting document.

If there is a value entered in 1 of the Upper or Lower limit fields, but not both, the “empty” column will still show on the PDF or attached supporting document, with a dash indicating there is no value entered for that height limit. For the example shown below, the Upper limit has no value entered, so there is a dash in that column.

If there is at least 1 height limit entered in a table, but not in all rows on that table, the rows with no height limits will show dashes in both height limit columns.

If there are no height limits entered in a table in the Schedule / memorandum panel, no height limit columns will show on the PDF or attached supporting document for that table.

Add ‘Height-limited’ (HL) to a parcel appellation
If your parcel has a height limit, you should add ‘Height-limited' to the parcel appellation. This will then show ‘HL-’ on the Schedule/Memorandum supporting document. The height-limit is in terms of the vertical datum in the Survey details panel.
In the New parcels panel, double-click in the Appellation field for the parcel.
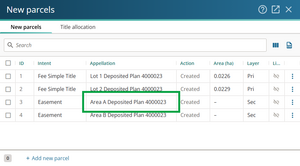
The Edit parcel appellation panel opens. Tick Height limited. This adds ‘Height-limited’ to the parcel appellation.
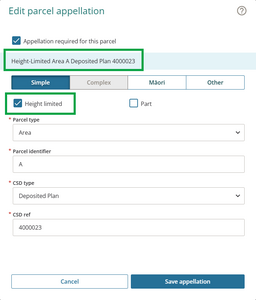
Select Save Appellation.

In the Schedule/Memorandum supporting document, the parcel will be shown with a prefix of HL-, indicating that the parcel includes a height-limited boundary.


For more information on height-limited easements, see the Cadastral survey guidelines on Height-limited boundaries:
Height-limited easements
and Spatial capture requirements