
Once you have spatially created an irregular line, you must capture the necessary attributes against the line in the Lines panel.
Changes to irregular line attributes
Any changes made to Legal description, Physical feature, or CSD Source will trigger the Y023 rule in Pre-validation.
After making any changes to these attributes, you will need to recompile your plans in Plan Generation.
Capture irregular boundary attributes
1. Open Lines panel and select an irregular line
Select the Lines icon in the Workflow control bar to open the Lines panel.
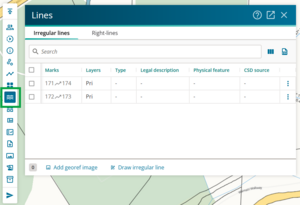
The panel opens displaying the Irregular lines tab. Any irregular lines you have spatially captured in your survey are listed here.
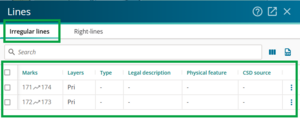
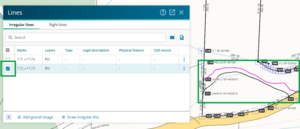
When you select an irregular line:
- spatially – the row is highlighted in the lines panel
- by ticking the checkbox in the lines panel – the irregular line is highlighted in spatial capture.


2. Check and edit irregular line Layers
By default, an irregular line drawn in Landonline will be captured in the Primary layer.
Irregular lines adopted from Landonline or imported from your third-party software may have been captured in more than 1 layer.
The available layers for irregular lines are:
- Primary
- Secondary
- Tertiary
- Strata
- Secondary centreline
- Tertiary centreline.
To add or edit layers for your irregular line:
- Double-click in the Layers field for the irregular line.
Select or deselect layers from the dropdown list to add or remove them.
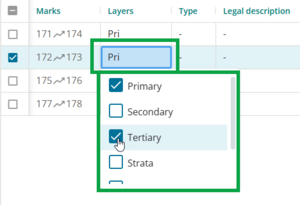
- Press Enter or click outside the dropdown list to save your selection.

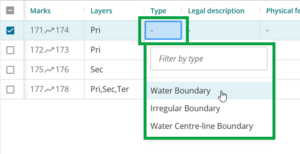
3. Select or edit Type of irregular line
You can add 3 types of irregular line:
- Water Boundary
- Irregular Boundary
- Water Centre-line Boundary.
To add or edit the type of irregular line:
- Double-click in the Type field for your irregular line to open the drop-down list.
Select the correct irregular line type from the list. You can also use the Filter by type field to type in the boundary type, then press Enter to select.

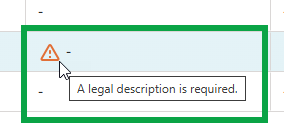
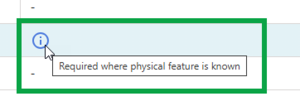
The type of irregular line you select dictates which other fields in the panel must also be completed. Icons display in these fields to help you.
An orange warning triangle in a field indicates the field is required.
A blue info icon indicates the field is optional.
- Hover your mouse over the icon for details of what is needed for the specific field.


4. Add Legal description
Depending on which type of irregular line you select, you may be required to enter a legal description. For a:
- Water Boundary – a legal description is required
- Irregular Boundary – a legal description is not required. You can use ‘Other’ for additional annotation.
- Water Centre-line Boundary – the legal description is automatically set to ‘Boundary follows centre-line of stream/river’.
To add a legal description:
Double-click in the Legal description field for your irregular line to open the drop-down list.
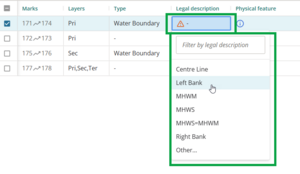
- Select the correct legal description from the list:
- Centre Line
- Left Bank – true left bank, the bank on the left-hand side when you are facing downstream
- MHWM – mean high water mark
- MHWS – mean high water spring
- MHWS=MHWM – mean high water spring and/or mean high water mark
- Right bank – true right bank, the bank on the right-hand side when you are facing downstream
- Other... – to add another legal description.

You can also use the Filter by legal description field to type in the legal description, then press Enter to select.
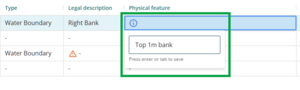
5. Enter a Physical feature
A Physical feature is required only when it is known. Examples include:
- it is shown on the adoption source
- you have surveyed the boundary for the first time, and it is a description of the actual boundary feature itself such as ‘top of bank’ or ‘bottom of 1m high bank’.
To enter a physical feature:
- Double-click in the Physical feature field for your irregular line to open the free-text field.
Enter a physical description, then to save it press Enter or Tab, or click outside the dropdown list.

6. Enter CSD Source
If you adopted your irregular line you will need to enter the referenced survey that the line was adopted from.
- New irregular lines will have no adoption source.
- As new Water Centre-line Boundaries are not allowed by the rules, an adoption source is required for this type of irregular line.
To enter a CSD source:
Double-click in the CSD source field for your irregular line to open the list of your dataset's referenced surveys.
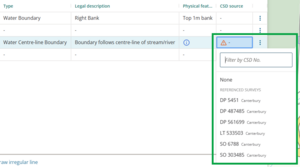
- You can:
select the correct Referenced survey from the drop-down list by clicking on it
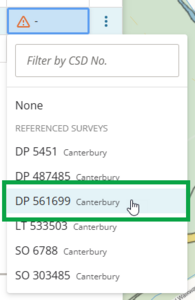
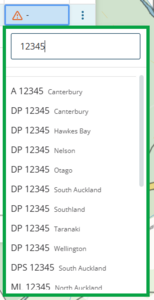
filter the list by DP, SO, etc by typing in the Filter by CSD No. field

search for a survey that’s not already in the list by entering a CSD number in the Filter by CSD No. field. Landonline will take a moment to search for all matching surveys, then display these in the drop-down. When you select one of these, it will also be added to the Referenced CSDs tab in the Survey details panel.
See also Add and edit Referenced CSDs


Ensure you select the survey reference from the correct land district.
How irregular boundary annotations are displayed in Plan Generation
In Plan Generation, the attributes added in Capture will appear on diagrams in your layout sheets as outlined below.
Survey layout sheets
Irregular lines on your survey diagrams will show (if applicable):
- Legal description
- Physical feature
- Adopted source.

Title layout Sheets
Irregular lines on your title diagrams will show:
- Legal description (if applicable).

Edit text on layout sheets
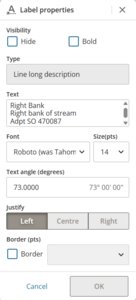
You can edit text on the layout sheets to allow a better fit. In Plan Generation layout sheets:
- Select the text.
Right-click and select Properties.
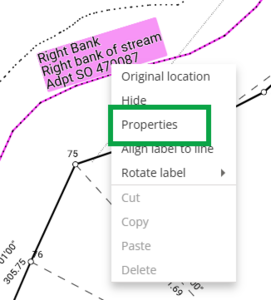
From the properties menu you can:
- insert a carriage return into the text to split a line over multiple lines
- remove line breaks to display the text all on one line
- change the font or font size
- add a border or make the text bold
- change the text angle.
For more information, see:
Layout Plan Sheets – Label properties


For irregular line labels, justification defaults to ‘Left’ only.