What to do
- Select the Marks icon from the Workflow control bar.

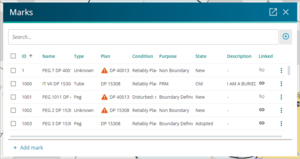
- This will bring up the Marks panel.

- The Marks panel contains a range of data:
- ID - Landonline displays the number assigned to this captured mark.
- Name - Landonline displays the mark name (i.e. the data from the Mark Type Abbrev, Mark No, and Mark Plan Ref fields).
- Type – where known, Landonline displays the type of mark, e.g. peg, tube, post, etc.
- Plan – Landonline displays the Plan number of the mark. If it’s a new mark, the plan number defaults to the current survey number. If it’s an existing or adopted mark, enter the appropriate survey number
- Condition – Landonline displays information on the known condition of the mark, e.g. Reliably Placed, Disturbed, Moved, etc.
- Purpose – Landonline displays the purpose of the mark, e.g. Non-Boundary, Boundary, PRM, etc.
- State – Landonline displays the state of the mark, e.g. New, Old, Adopted, etc.
- Description – where known, Landonline displays a description of the mark, e.g. 0.3d in grass berm. You can type in a description of the mark as needed.
- Linked – Landonline displays an icon to show whether the mark is linked or unlinked
- You can sort on any of these fields by clicking on the field header.

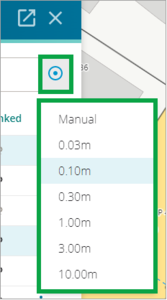
- On the right-hand side of the Marks panel, near the top of the panel, there is an Automatic mark linking icon (see Automatic mark linking).
- When you select this, a dropdown menu appears. From here you can select the spatial proximity tolerance or, select Manual to manually link the captured marks.

-
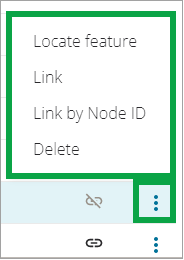
At the end of each mark row is a more options menu. Select the three-dot icon to bring up the menu. From here you can:
- Locate a feature on the spatial map. Note that the tick box for the required feature will need to be selected before the feature can be located.
- Link (or unlink) a mark.
- Delete a mark

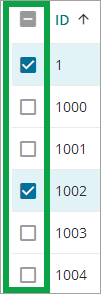
- Use the checkboxes on the left-hand side to select and view marks. You can select one mark by checking the box next to that mark, or multiple marks by checking the boxes next to the marks you want to see, or use the first checkbox and select all marks, or use your shift key to select a range of marks.

- When you select a mark in the panel you will see it highlighted in yellow on the map.

If multiple marks are selected, the locate feature function will change the scale and location of the spatial view to display all those marks. You can also select a mark in the Marks panel by selecting it in the spatial display.