
To capture an irregular line you must have start and end marks as part of your survey. These cannot be the same position, for example drawing around a lake or island and starting and ending at the same mark.
The exception process may be required if any existing nodes in Landonline are likely to cause distortion to your irregular line.
Follow the process below to avoid issues when capturing your irregular lines:
Step 1: Investigate underlying marks
- Check to see if:
- there are any underlying marks along the existing irregular line you are replacing. You will need to confirm if they are part of the line you are replacing.
- the underlying marks for terminal points of your irregular line are spatially inaccurate in Landonline.
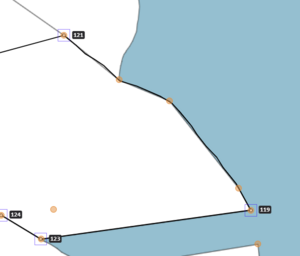
To display underlying marks in Landonline, turn on the Underlying marks layer in the tools control toolbar. These display orange in your spatial capture screen.

If there are underlying marks along the existing irregular line:
- determine which marks (if any) must be included in your survey
- determine which are “mandatory” versus “optional”.
For an explanation of mandatory and optional marks, see:
- Landonline survey support - Missed marks
- Cadastral survey guidelines - Capture and depiction: Blue nodes – selecting missed marks
Example: The image below shows an irregular line drawn between marks 121 and 119. There are underlying marks along the existing boundary.
In this example, investigation has revealed that there are likely to be:
- 1 mandatory mark (a) and
- 2 optional marks (b) along this new boundary.
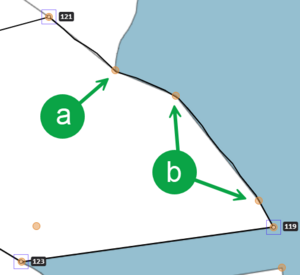
The mandatory mark (a) needs to be adopted into the new dataset as it is used to form the topology of more than 2 primary parcels.
If an optional mark (b):- is a surveyed position, it will also need to be adopted into the dataset
- is not a surveyed position, it can be ignored.
- Determine if any of the underlying marks that must be included in your survey:
- are spatially inaccurate, and
will cause issues for your capture if you use them in their current position.
For information on issues caused by inaccurate marks, see:
Exception requests and when to use them


Step 2: Deal with spatially inaccurate underlying marks
As a result of your investigation, you can put any spatially inaccurate underlying marks into categories:
1. Marks requiring exception request
- Mandatory missed marks that are not required to remain by the time you submit your survey.
- Send an exception request with suitable evidence, requesting that these are removed from Landonline.
- Mandatory missed marks that are required to remain by the time you submit your survey AND are spatially inaccurate.
- Send an exception request with suitable evidence, requesting that these are moved to the correct location.
- Optional missed marks that are required to remain by the time you submit your survey AND are spatially inaccurate.
- Send an exception request with suitable evidence, requesting that these are moved to the correct location.
- Underlying marks at the terminal points of your irregular line that are spatially inaccurate.
- Send an exception request with suitable evidence, requesting that these are moved to the correct location.
You can submit all these requests in one exception request.
See: Create an exception request
2. Marks that you can skip when the “optional missed mark” tests are run
Optional missed marks that are not required to be included by the time you submit your survey.
- Do not include these marks via adoption or the missed marks process.
Step 3: Adopt and link marks
After completing the steps above, and before you begin capturing any irregular lines in Landonline:
- Link the terminal points of your irregular line to their corresponding underlying marks in Landonline. These marks should be spatially accurate if you followed the process above.
- Adopt any mandatory or optional marks that will remain by the time you submit your survey.
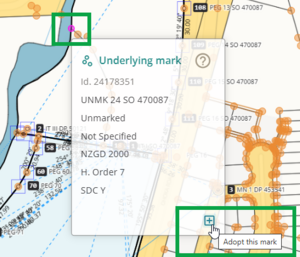
Turn on Underlying marks layer and select the Inspect and Adopt tool.

Select the mark, and left-click the Adopt this mark icon.


Step 4: Draw your irregular line
Upload an image as a georeference.
For more information, see:
Import georef image
Start drawing your irregular line. You must draw the boundary as separate irregular line segments between each of the adopted or captured marks along the boundary.
For more information, see:
Draw an irregular line
Step 5: Add irregular boundary attributes
Once you have spatially created your irregular line, capture the necessary attributes against the line in the Lines panel.
This may include:
- Layer
- Type of irregular boundary
- Legal description
- Physical description
- CSD source.
Icons will display in some of these fields to identify which attributes need to be populated.
For more information, see:
Edit irregular boundary attributes

Step 6: When linking parcels
During parcel linking, DO NOT add marks to irregular lines during the missed mark process.
If you do, this may cause your irregular line to become right-lined, and your irregular lines won’t display in Plan Generation layout sheets.
See also: