
Generally, you must complete and send a Notice of Change (NoC) in Landonline when submitting a dealing that contains a change of ownership instrument.
For more information, including situations where a NoC cannot be completed in Landonline, see:
Instruments eligible for a Notice of Change within a dealing
You can create NoC within a dealing in Landonline for instrument types:
- T – Transfer
- TSM – Transmission
- CN – Change/Correction of Name
- TPS – Transfer in exercise of Power of Sale
- A90 – Application under s90 Land Transfer Act 2017
- CO – Court Order.
T, TSM, CN, and TPS instruments will initially show NoC Required on the Instruments & Roles page. This status will update automatically as you work through and complete the NoC.

Not every A90 or CO instrument changes ownership. You must determine whether a NoC is required for these instruments. For more information on NoC requirements, see:
- Notice of Change requirements by instrument type
- Notice of Change legislative changes, guidance, and FAQs
View NoC status
You can check the NoC status for an instrument in several locations within a dealing. Each location displays the status differently.
NoC status on Instruments & Roles page
The NoC column displays:
- NoC Required for T, TSM, CN, and TPS instruments if the NoC has not been started
- no status for CO and A90 instruments if the NoC has not been started
- NoC in Progress after the NoC has been started and saved
- a green tick icon once the NoC is marked Ready to send.
You can select the status or green tick to open the NoC form.

If there are no NoC eligible instruments in the dealing, the NoC column is not displayed.

NoC status on Notice of Change page
The Notice of Change landing page lists all instruments in the dealing for which you can create a NoC.
The Status column displays:
- a dash when the NoC hasn’t been started
- In progress once the NoC has been started and saved
- Ready to send once the NoC is marked Ready to send.

NoC status on Certify & Sign and Release pages
On the Certify & Sign and Release pages, the NoC column:
- is blank if the NoC hasn’t been started
- displays an orange warning triangle if the NoC has been started and saved
- displays a green tick icon once the NoC is marked Ready to send.


Note that NoC status does not affect your ability to Certify and Sign, Release, or Submit.
1: Navigate to Notice of Change form
You can access Notice of Change (NoC) in several ways from within your dealing.
Open the NoC from the Instruments & Roles page
Open NoC form via NoC status column:
If the instrument displays a NoC status NoC Required, NoC in Progress, or the green tick icon, select the status or icon to open the NoC form in full-screen mode.

Return to Instruments & Roles by selecting:
- Back to instruments & Roles at the bottom of the screen
- Setup [instrument] in the header
- the back arrow at the top left of the screen.

Go to Notice of Change page from 3 dot menu:
Select the 3-dot menu next to any NoC-eligible instrument, then select Notice of Change to open the Notice of Change landing page.
See: Open NoC panel on Notice of Change page

Open the NoC from the Prepare instrument screen
In the Prepare instrument screen, select either:
- Go to Notice of Change at the bottom of the screen
- Notice of Change in the header.
This opens the NoC form in full-screen mode.

Note that Go to Notice of Change is not available in Instrument mode.
Return to Prepare instrument by selecting:
- Back to [instrument] at the bottom of the screen
- Setup [instrument] in the header
- the back arrow at the top left of the screen.

Open NoC panel on Notice of Change page
The Notice of Change landing page lists all instruments in the dealing for which you can create a NoC.
Select anywhere in an instrument row except the instrument link to open the NoC form in a panel at the right.
Selecting the instrument link opens the Prepare instrument screen.

Select:
- the arrows at the top left of the panel to move to the NoC form for the next or previous instrument in the dealing
- X to close the panel.

Go to Notice of Change page from Dealing Details panel on the Dealings landing page
On the Dealings landing page, open the Dealing Details panel.
Select the 3-dot menu next to an instrument then select NoC to open the Notice of Change landing page.
See: Open NoC panel on Notice of Change page

2: Review and complete the NoC form
A Notice of Change form has some details pre-populated from the dealing. You should review and edit these if needed.
Other fields will need to have information entered. You must complete all fields marked with a red asterisk.
Hover your mouse over an information icon to learn more about a field.

Changes you make on the NoC form will not change the dealing information.
As you complete the form you can:
- select the arrow next to a section heading to collapse or expand a section
- select Preview at the bottom of the screen to preview the ‘Notification of change of ownership of rating unit’ notice in a new tab
- select Save draft to save your progress if you are not ready to mark the NoC as Ready to send.

Changes to NoC aren't automatically saved
Landonline will not save your information if you navigate away from the NoC without selecting Save draft or Ready to Send.
Corrections (CNoC) or post registration NoC (PRNoC) are saved only when the NoC is submitted.
3: Check and edit Property details
The Property section is populated from district valuation roll (DVR) data supplied by the relevant Territorial Authority (TA) and the associated Records of title in the dealing.
Check these details to ensure they are correct. You can:
- select a Territorial/Unitary authority if none is listed
- edit the Address of property.
All other fields are read-only.

Relevant TAs can request that other interested parties such as regional councils receive a copy of the Notice of Change (NoC). These will be listed at the left of the Property section.
Water providers
You need to send a copy of the finalised Notice of Change directly to the relevant water provider. Water providers do not receive automatic notices from Landonline.
Select Territorial/Unitary authority if none listed
Check the TA's name in the Territorial/Unitary authority field has pre-populated correctly. This field is read-only.
If no TA is listed, for example when dealing with a new Record of title, then the field will contain a drop-down list for you to select the correct TA.

Check the valuation reference
Check the Valuation reference. This field is read only.
If no valuation reference is displayed, for example when dealing with a new Record of title, the field is left blank for the TA.
If there are differences between the valuation reference and associated Records of titles displayed, use the Solicitor/Conveyancer note field in the Transaction section to leave a note to the TA to update their records. You can also contact our Customer Support for help.
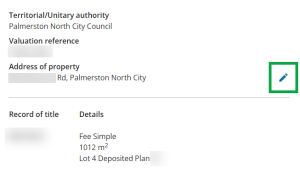
Edit Address of property
This address should only be changed if the physical address of the property is incorrect or missing.
Select the pencil icon to the right of Address of property.
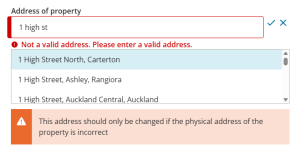
- A warning message appears. Select Continue to change the address.
Start typing the address into the search bar, and select the correct address from the drop-down.
The Address of property is updated, and the old address is now displayed with strikethrough. Select the Click to revert changes icon to restore the old address if needed.
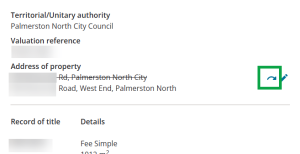


The NoC will highlight address changes so the TA can update their DVR when they receive the NoC.
Check the Records of title
Review the Records of title. These fields are read-only.
Go to the Instruments & Roles page to make changes to the affected titles.
4: Complete Owners’ details
For templated instruments, such as transfers, transmissions and change/correction of name, the Notice of Change (NoC) is populated with the new and existing owners’ details from the information entered in the Prepare instrument screen.
For image only instruments, such as TPS, CO and A90, the NoC doesn't pre-populate the new owner details so these will need to be added manually. The existing owner details populate with the registered owners of the affected titles.
Ensure you add the new owner's preferred address for receiving rating information and invoices.
Check owners’ names
Check the new and existing owners' names are correct.

Go to Prepare instrument to update the new owners’ names.
If the NoC is for an image only instrument, use the Edit button to manually add the New owners' names.

Edit New owners’ contact details
Check the Country of postal address. It defaults to New Zealand. To enter an overseas address, remove New Zealand, then search for and select the correct country from the drop-down.
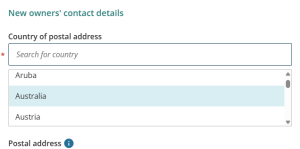
The Postal Type defaults to Urban. You can change this to Rural, or click the arrow next to Box/bag/counter delivery to select:
- PO Box
- Private Bag
- Community Mailbox.
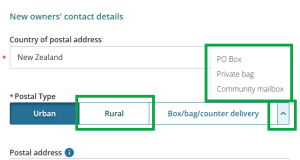
Complete the Postal address fields for the selected postal type.
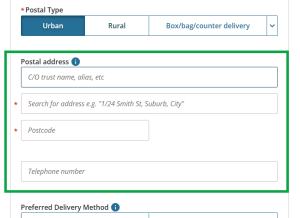
- For an urban or rural address, search for and select the address from the drop-down. Enter the postcode. For a rural address, also enter the rural delivery (RD) number.
- For a PO Box or Private Bag, enter the box or bag number, town or city, and postcode. For a PO Box, you can also enter the Box lobby name.
- For a community mailbox, enter the mailbox number, post office, town or city, and postcode.
- Include a Care of name if the Territorial Authority's communications are to be addressed to another person or organisation, for example a trust.


Enter only one postal address
You can enter only one postal address for the new owner. If they have more than one address, use the Solicitor/Conveyancer note field in the Transaction section to inform the council of any additional addresses.
Select preferred Delivery Method
Select Email or Post as the new owner’s preferred method for receiving rates correspondence.
If you select Email, you must enter an email address.

5: Complete Transaction details
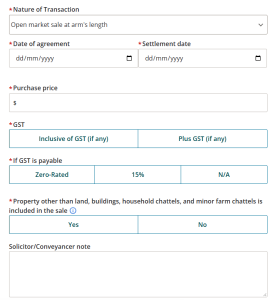
In the Transaction section, enter details about the transaction. The fields displayed and information you must provide depend on the selected Nature of Transaction.
For property sales completed through a transfer in Landonline, the NoC must include the sales information required by the amended Rating Valuations Regulations. In most cases, this information should be taken from the sale and purchase agreement and related transaction documents. Ensure all required fields are completed fully and accurately.
- Mandatory fields include:
- Nature of transaction
- Purchase price
- Date of agreement
- Settlement date
- GST status of the sale price, where applicable
- whether the sale price includes items other than land and buildings, household chattels, or farm chattels.
For specific information about these fields, see:
Guidance on required fields in Transaction section of Notice of Change
Select Yes or No for whether the transaction relates to only part of a title. If you answer Yes, we recommend you use the Solicitor/Conveyancer note field to provide more detail.
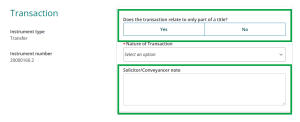
Use the drop-down arrow to select the appropriate Nature of transaction. The available options are displayed in a multi-level menu.
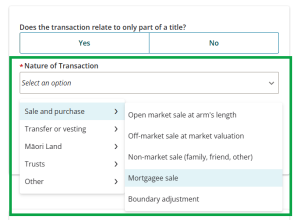
Complete the fields displayed for the selected transaction type.


6: Complete Rates information
- Enter the first instalment number and rating year that the new owner will be responsible for in the New owners first instalment number field.
Entering the instalment number is not mandatory, but it helps the Territorial Authority (TA) determine who to contact about unpaid rates.
- By default, new owners’ details are not private in the Rating Information Database. Select Yes if the new owners' details should be made private.
- If the property is subject to a registered lease where the lessee must be recorded as the ratepayer under section 11 of the Local Government (Rating) Act 2002, select Yes. Otherwise, leave the answer set to No.

7: Review Practitioners’ details
The Practitioners section populates with the primary contact details from each firm involved in the instrument the NoC is associated with.
If there are multiple primary contacts for the instrument, it will populate with the first primary contact's name.
Edit these details if you want to provide the Territorial Authority with different contact details for your firm.
Any changes made to this section do not change the dealing information.

8: Send completed NoC to the Valuer-General and Territorial Authority (TA)
When you have completed the NoC, select Ready to send at the bottom of the screen.

Note: You can select Ready to Send only if your firm is acting for the existing owners. If your firm is acting only for the new owners, complete the form and select Save NoC & Close.

If all required information has been entered, a confirmation message appears and Landonline returns you to the previous screen.

If any mandatory fields are incomplete, an error message appears and the missing fields are highlighted in red. You must complete these fields before the NoC can be marked Ready to send.

When you mark the NoC as Ready to send:
- its status changes to Ready to send or the green tick icon, depending on where the status is displayed
See: View NoC status - Landonline sends the finalised NoC to the Valuer-General and the relevant TA by overnight batch email once the dealing is registered
- each practitioner named in the NoC will be emailed a copy of the final NoC.
If the NoC isn’t finalised by marking Ready to send, a copy of the draft NoC is sent to each party in the dealing. Warnings that the NoC hasn’t been finalised are triggered when releasing instruments in a dealing.
Any changes made to an instrument will be reflected in the NoC before it's sent, even once it's marked Ready to Send. This ensures the Valuer-General and TA receive correct, up-to-date data.
For details on how to send a CNoC or PRNoC, see:
Updating an NoC when it has Ready to send status
You can update a NoC even when it is has a Ready to send status.
When you select a field to edit, a message appears advising that any changes will change the status from Ready to send to In progress.
Select Continue to make edits to the NoC.

Ensure you re-select Ready to send at the bottom of the NoC before the dealing is submitted.