
See also the Cadastral survey guidelines: Schedule / Memorandum information
For help with adding existing easements to a table in the Schedule / memorandum, see:
Add existing easements to be retained or surrendered in the Schedule / memorandum panel
For help with showing height limits in a table in the Schedule / memorandum, see:
Show height limits in Schedule / memorandum tables
Populate a table of new easements
In our example, we are populating a Memorandum of easements table. The process is similar for other new easement table types.
We have noted any differences within the relevant section.
1. Capture all parcels
Ensure all relevant parcels under survey have been captured in the Existing parcels and New parcels panels.
For example, to have an abutting parcel appear in the table as the benefited land, capture that abutting parcel as Referenced in the Existing parcels panel.
- This abutting parcel should remain in the dataset as a Referenced parcel even after the parcel has been selected in the Schedule / memorandum panel.
- If the abutting parcel is not land under survey, the title reference for the abutting parcel does not need to be captured in the Estate records tab.

Note: If you have linked all your parcels before populating the Schedule / memorandum panel, Landonline will
- automatically populate Burdened land from your selected Shown appellations
- check that Shown, Burdened, and Benefited parcels are valid together.
2. Create a new easement table
Open the Schedule / memorandum panel and select +Create table, then select the appropriate new easement table type from the drop-down list. For this example we will select Memorandum of easements.

Populating the table
You can complete fields in any order. In this guidance, we work left to right.

3. Add purpose
Double-click into the Purpose field and select the easement’s purpose(s) from the list. You can select:
- more than 1 purpose where applicable
- Other to enter a purpose that is not in the list.

Press Tab or Enter on your keyboard, or click outside the Purpose dropdown, to populate your selection into the Purpose field.

When you select a purpose of Other, a free text field appears. You must enter something in this field to continue.

Press Tab or Enter on your keyboard, or click outside the Other field, to populate your selection into the Purpose field.
4. Select shown
For the Shown field, you can:
- select an appellation from a list of Created parcels and Referenced Non-primary parcels in the survey
- enter an appellation via free text, for parcels not listed
- spatially select a linked created parcel.
Multiple Shown appellations can be included in the same row if the burdened land is the same.
Option 1: Select an appellation from a list of Created parcels and Referenced Non-primary parcels in the survey
Double-click into the Shown field and select the appellation from the list. You can type to filter the list if there are a large number of appellations listed.

Press Tab or Enter on your keyboard, or click outside the Shown dropdown, to populate your selection into the Shown field.

Note: If you have linked all your parcels, the Burdened land will automatically populate from your selected Shown.
Option 2: Enter an appellation via free text
If the appellation you need is not listed, you can enter the appellation via free text.
Double-click into the Shown field and type an appellation into the free text field.

Press Enter on your keyboard to add the appellation to the list.

The appellation is automatically selected in the list.
Note: A free-text appellation will not be:
- saved if you deselect it and continue
- retained through remaining rows in the table.

Press Tab or Enter on your keyboard, or click outside the Shown dropdown, to populate your selection into the Shown field.

Option 3: Spatially select a linked created parcel
Select the Parcel picker tool that appears when you hover your mouse over the Shown field.

The screen switches to Select parcel mode. All linked parcels are displayed with red outlines.
Left-click a spatial parcel to add it to Shown easement parcels at the bottom right of your screen. Any selected parcels also display pink on screen.

Select Continue to populate your selection into the Shown field. The Burdened land will also automatically populate from your selected Shown.

5. Select burdened land and benefited land
You can select the burdened and benefited land from a list of captured primary parcels in your survey.
Note: the process to select a parcel is the same for the Benefited land and Burdened land fields.
For new easements:
- you can select from captured Created, Referenced, and Affected primary parcels
- the burdened field is automatically populated from Shown if your parcels are linked and the Shown appellation is a created parcel in your survey
- once the burdened land is selected, it’s no longer available as an option for benefited land in that row.
What to do when Parcel Appellation and Legal Description are different
A schedule/memorandum is a land-registration document, not a survey document. Its purpose is to define rights and obligations and attach those rights to Records of Title.
This means that the Burdened land and Benefited land fields in the Schedule / memorandum panel display Legal Descriptions rather than Parcel Appellations.
There may be differences in Landonline between Legal Descriptions and Parcel Appellations.
Example of a minor difference:
Legal Description: Section 13 Block II Otara
Parcel Appellation: Part Section 13 Block II Otara SD
Example of a more significant difference:
Legal Description: Part Old Land Claim 76
Parcel Appellation: Part Wesleyan GRANT
It is acceptable for there to be differences between a Legal Description and Parcel Appellation for land under survey. Please include a brief explanation in the survey report to assist validation of the survey dataset.
Option 1: Select an appellation from a list of Created, Referenced, and Affected primary parcels in the survey
Double-click into the Burdened land field and select an appellation from the list. You can type to filter the list if there are a large number of appellations listed.

Press Tab or Enter on your keyboard, or click outside the Burdened land dropdown, to populate your selection into the Burdened land field.

Repeat the process for Benefited land.
You will see an orange warning triangle if:
- shown and burdened parcels are not valid together
- the same parcel is included in both burdened and benefited land
- you have not completed a required field.
Hover your mouse over a warning triangle to see the issue.

Any orange warning triangles must be resolved before the Schedule / memorandum is attached as a supporting document.
Option 2: Use parcel picker tool to select burdened or benefited land
You can also use the Parcel picker tool to spatially select a parcel.
Select the Parcel picker tool in the Burdened land field.

Left-click a spatial parcel to add it to Burdened easement parcels at the bottom right of your screen. Any selected parcels also display pink on screen. Select Continue to populate your selection into the Burdened land field.

Repeat the process for Benefited land.
6. Select grantee (for table of easements in gross)
For a Schedule or Memorandum of easements in gross table, the Benefited land field is replaced by a Grantee field.

Double-click into the Grantee field and type a grantee via free text.

To save your grantee to the row, either:
- press Tab or Enter on your keyboard
- click outside the Grantee dropdown.

Add new row or new purpose to a table
Select:
- +Add new row to add a new row with the same purpose as the previous row to the current table. The purpose will display as ditto marks “ “ (double quotation marks).
- +Add new purpose to add a new row with a different purpose to the current table.

See also: Insert a new row into a table
Insert a new row into a table
You can use Insert row to create a new row with the same purpose directly below any selected row.
Select the 3-dot menu at the right of the row where you want to insert a new row directly below.
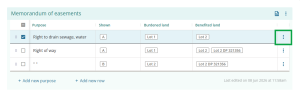
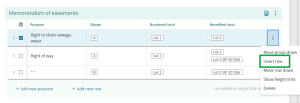
Select Insert row.
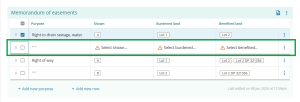
A new row with the same purpose is added directly below the selected row. The purpose will display as ditto marks “ “ (double quotation marks).


Reorder content in a table
You can change the order in which the rows or purpose groups appear in a table. A purpose group is automatically created by consecutive rows that have the same Purpose.

Use 3-dot menu to reorder rows or purpose groups
Select the 3-dot menu at the right of a row to open the More actions menu.
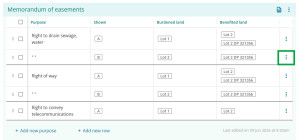
The Move options available for each row will depend on that row’s current position. Options can include:
- Move group up – moves all rows in the purpose group up 1 group position
- Move group down – moves all rows in the purpose group down 1 group position
- Move row up – moves the selected row up 1 position
- Move row down – moves the selected row down 1 position.
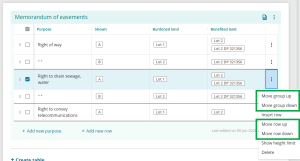
- Select a Move option. The row(s) will move to their new position.
If you attempt to move an individual row up or down, positioning it within a different purpose group, you will see a warning.
Select:- Update purpose group to change the moved row’s purpose to the same purpose as its new group
- Keep purpose unchanged to keep the row’s original purpose.
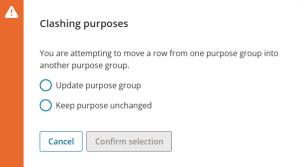
Then select Confirm selection.


If a group contains a row that is not fully completed, the row you are moving into the group will be inserted above the incomplete row.
Drag to reorder rows
Left-click and hold the 6-dot icon at the left of the row you want to move.
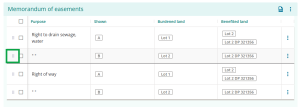
Drag the row to its new position.
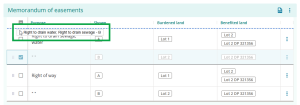
Release the mouse once you have dragged the row to its new position.
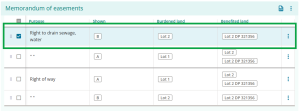
If you attempt to move a row from one purpose group to another purpose group, you will see a warning.
Select:- Update purpose group to change the moved row’s purpose to the same purpose as its new group
- Keep purpose unchanged to keep the row’s original purpose.
Then select Confirm selection.


If a group contains a row that is not fully completed, the row you are moving into the group will be inserted above the incomplete row.
Reorder columns
You can rearrange the order of the columns by dragging and dropping them.

The column order will revert to the default setting when you close the panel, download the schedule/memorandum, or attach it to the survey.
Delete a row from a table
You can delete individual rows or select multiple rows to delete at once.
See also: Delete table
Deleting a row is irreversible.
You will need to add or insert a new row if you delete a row in error.
Use the check-boxes at the left of the table to select the rows you want to delete.
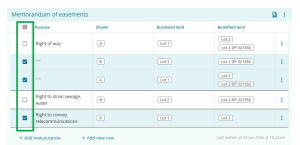
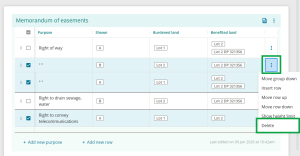
Select the 3-dot menu at the right of a selected row to open the More actions menu, then select Delete.
The selected rows are immediately deleted.
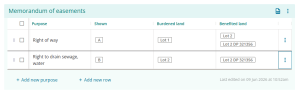


If you delete all rows in a table, the +Add new row button will be greyed out until you add a new purpose.

Download table contents as CSV
You can download an individual table in the Schedule / memorandum panel as a CSV file. The table doesn’t need to be complete - any empty fields in the table will display empty cells in the file.
Select the Download CSV icon at the top right of the table.

For more information, see: Download .CSV file