
See also the Cadastral survey guidelines:
- Schedule / Memorandum information - Covenants
- Survey requisitions – common items – Easement Schedule
- Unit plans – CSD requirements for easements and covenants on unit plans
Record new covenants or existing covenants to be retained
Use the Notes table type to record new or existing covenants being retained.
You can also use the Notes table to record partial surrenders of easements.
See also: Recording easements to be surrendered and covenants to be revoked in the title plan
1. Create Notes table
Open the Schedule / Memorandum panel and select +Create table.

Select Notes.

2. Add covenant notation
Select +Add Note.

Type in the appropriate notation to meet CSR 2021 rule 95(2). Use the Enter key to move to a new line.

3. Save your notation
Your notation is autosaved whenever you click away from the entered text, or when you close the Schedule /memorandum panel.
4. Edit text in the Notes table
Left-click into the Notes table to edit text.
5. Adding more than one covenant notation or note
You can have only 1 Notes table in the Schedule / memorandum.
Specify different notes by starting each note on a new row and adding a number to each note.

You can have both a Notes table and an Amalgamation conditions table.
6. Delete Notes table
Select the 3-dot menu and select Delete table to remove the Notes table from the Schedule / memorandum.

You can also change the table type to Amalgamation conditions, or vice versa.
For more details, see Change table type
Record existing covenant to be revoked
Use the Covenants to be revoked table type to record existing covenants to be revoked.
1. Capture all parcels
Ensure all relevant parcels under survey have been captured in the Existing parcels panel.

2. Add estate records
Add the correct Record of Title(s) to the Estate records tab in the Existing parcels panel.
This enables tables created in the Schedule / memorandum panel to recognise any instruments recorded against the Record of Title(s).

3. Create covenants to be revoked table
Open the Schedule / Memorandum panel and select +Create table.

Select Covenants to be revoked.

4. Select shown
If you have Extinguished or Referenced a Non-primary parcel in the Existing parcels panel, this will then be available as an option for Shown. Otherwise, you can enter Shown as free text.
Double-click into the Shown field.

If the appellation relevant to the covenant to be revoked appears in the list, select it.

If the appellation you need is not in the list, type the appellation into the free text field.

Press Enter on your keyboard to add the free-text appellation to the list.

The appellation is automatically selected in the list.
Note: A free-text appellation will not be:
- saved if you deselect it and continue
- retained through remaining rows in the table.

Press Tab or Enter on your keyboard, or click outside the Shown dropdown, to populate your selection into the Shown field.

5. Select creating document
Double-click into the Creating document field.

A popup window of instruments recorded against any Record of Title(s) captured in the Estate records tab is displayed at the right of the panel.

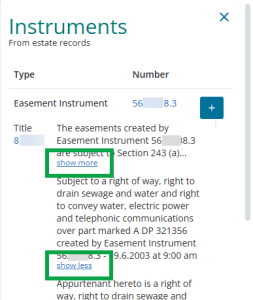
Use your mouse or the scroll bar on the right-hand side of the panel to scroll through the instruments to find the covenant rights that are to be revoked. To view more detail about an instrument:
Select show more to expand text or show less to collapse text.
Select an Instrument number or Title reference to open Landonline Web Search in a new browser tab. The summary page for the selected record will display.
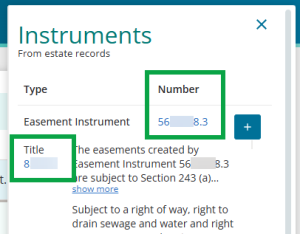


Select the Add instrument to table button (the Plus icon) to add an instrument as the creating document.


To change the creating document, double-click back into the field and select a different instrument.
6. Add further rows to the table as needed
Select +Add new row to add a new row to the table.

See also: Insert a new row into a table